Container Orchestration with K8s
Introduction to Kubernetes
- Open source container orchestration tool
- Helps you manage containerized applications in different environments
- The need for a container orchestration tool
- Trend from Monolith to Microservices
- Increased usage of containers
- Demand for a proper way of managing containers
- Features
- High availability or no downtime
- Scalability or high performance
- Disaster recovery - backup and restore
Main K8s components
Node and Pod
- Node
- Server
- Physical or VM
- Pod
- Smallest unit of K8s
- Abstraction over container
- Creates running environment or layer on top of the container
- You only interact with the K8s layer
- Pod is meant to run one application container
- The exception is if you have a side service that has to run alongside the container in the Pod
- K8s offers a
virtual network - Each Pod gets its own IP not the container
- Pods communicate with each other using the IP
- Pods are ephemeral
- When Pod crashes, it is recreated with a new IP
- Meaning any Pod that communicates with the crashed Pod using its IP will not be able to communicate with the new Pod
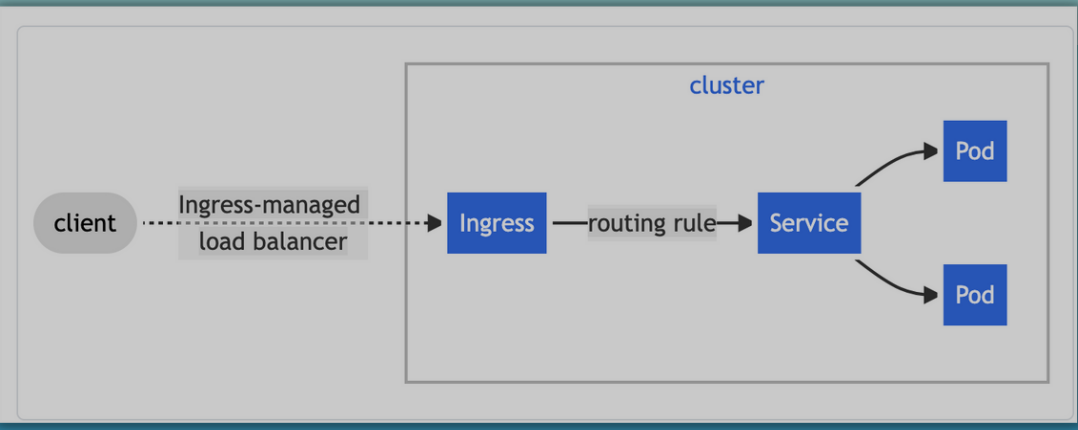
Service and Ingress
- Service: Basically a
static IPorpermanent IPthat can be attached to each Pod - Lifecycle of Pod and Service aren't connected
- If the Pod dies, the Service and its IP will stay
- App should be accessible through the browser
- You'll need to create an external service
- External services open communication from external sources
- You'll need an
Ingress- The request goes to
Ingress, and it forwards the request to the service - Routes traffic into the cluster
- The request goes to
- You'll need to create an external service
- For a DB, you won't want it to be open to external communication
- You'll need to create an internal service
ConfigMap and Secret
- Database URL is usually in built application
- A change to the URL will require you to rebuild and redeploy the whole image
- K8s has a
ConfigMapto help with this - ConfigMap
- External config to your app
- Connect
ConfigMapto the Pod so that the Pod will get the ConfigMap data - You don't put credentials like username and password into
ConfigMap
- Secret
- Used to store secret data
- It stores data in base 64 encoded format
- Encrypted with 3rd party providers to secure data
- Connect it to your pod to have access to secrets
- Can use data from
ConfigMaporSecretas envs or as a properties file
Volumes
- If DB container or Pod gets restarted, you'll lose the data
- You can use Volumes
- Attaches physical storage on HD to your Pod
- Storage could be on a local machine or remote outside the K8S cluster
- K8s does not handle persistence by default
Deployment and StatefulSet
- What happens when application pod dies or is restarted
- Instead of relying on one application Pod and one DB Pod, we replicate everything on multiple servers
- We'd have another node where a replica or clone of our app would run which would also be connected to the
Service- Service has 2 functionalities
- Permanent IP
- Load Balancer: Catches requests and forwards it to whichever Pod is less busy
- Service has 2 functionalities
- We'd have another node where a replica or clone of our app would run which would also be connected to the
- To create the second replica, you define the blueprint for the application Pod and specify how many replicas of the Pod you would like to run
- That component or blueprint is a
Deployment - In practice, you won't be using Pods. You'll use deployments
- Can scale up or down the number of Pods that you need
Deploymentsare abstractions of Pods
- We can't replicate the database using a deployment
- This is because DBs have state. i.e. its data
- We've clones of the DB, they'll all need to access the shared data storage
- You'll need a mechanism to manage which Pods are writing or reading from storage to prevent data inconsistencies
- That mechanism along with the replicating feature is offered by a component called
StatefulSet- For stateful apps like databases
Deploymentsare forstatelessappsStatefulSetsare forstatefulapps or databases- Handles pod replication and scaling
- Ensures DB reads and writes are synchronised to prevent inconsistencies
- Deploying StatefulSet in K8s is not easy
- Common Practice
- Host DB outside K8s cluster
- Have stateless apps inside K8s cluster
- Common Practice
K8s Architecture
- Nodes
- Master
- Slave
- Node Processes
- eg. One node, 2 apps: One app, one db
- Node aka worker servers
- Each node will have multiple pods with containers running
- 3 processes must be installed on every Node to use and manage those Pods
- Worker Nodes are the cluster Servers that actually do the work
- First Process: Container runtime
- Docker, containerd, cri-o
- containerd is much more lightweight than docker
- Second Process: Kubelet
- Schedules pods and containers underneath
- Is a process of K8s itself unlike the container runtime
- Kubelet interacts with both the container and the Node
- Kubelet takes the config and runs the pod with a container inside and assigns resources like CPU, RAM and storage to the container
- Nodes communicate using services
- Third Process: Kube Proxy
- Must be installed on every node
Kube Proxyforwards requests- Makes sure communication works in a performant way with low overhead
- e.g. Makes sure the app connects to DB in the same node instead of reach out to communicate with DB in another node
- Managing processes are done by
Masternodes
Master Process
- Has 4 processes that control the cluster state and the worker nodes as well
- API Server
- User interacts with API server using a
clientlike K8s dashboard - Acts like a cluster gateway
- Gets requests for updates and queries
- Acts as a gatekeeper for authentication
- The only entry point into the cluster
- User interacts with API server using a
- Scheduler
- When you make a request to create a new Pod, the API server validates the requests and forwards it to the
Schedulerto schedule the application pod on one of the worker Nodes - Has intelligent way of deciding on which Node the next component will be scheduled
- Just decides on which Node the component or resource will be created
- The
Kubeletis responsible for actually creating the components
- When you make a request to create a new Pod, the API server validates the requests and forwards it to the
- Controller manager
- Detects cluster state changes
- e.g. Crashing of Pods
- If Pod dies, it makes a request to the Scheduler to reschedule the dead pods and the process happens all over again
- etcd
- Is a key value store of a cluster state
- Is like a cluster brain
- Cluster changes get stored in the key value store
- The other processes like Scheduler and Controller manager work because of the data in etcd
- What resources are available?
- Is cluster healthy?
- Did cluster state change?
- Application data is not stored in etcd
- In practice, the K8s cluster is usually made up of multiple Master Nodes where each master runs its own master processes
- The
API serveris load balanced etcdstore forms a distributed storage across master nodes- E.g.
- In a small cluster, you can have 2 master nodes and 3 worker nodes
- Hardware resources of master and node servers differ
- Master
- More important processes but use less resources because they have less load
- Worker
- Do the actual job of running jobs and containers so require more resources
- As application grows, you can add more master and node servers to your cluster
- Can add new Master/Node servers
- Master
- Get new bare server
- Install all the master node processes
- Add it to the cluster
- Worker
- Get bare servers
- Install worker processes
- Add it to the cluster
Minikube and Kubectl Local Setup
- Minikube
- Production Cluster Setup
- Multiple Master and Worker Nodes
- Separate virtual or physical machines
- When you want to test something locally, you can use
minikube - It is a one node cluster where Master and worker processes all run on one machine / node
- Has Docker runtime pre-installed
- Will be able to run pods on this node
- Will run on the laptop through a Virtual Box or some other hypervisor
- Minikube will create a virtual box on your laptop and the node runs in that virtual box
- Minikube is a one node K8s cluster that runs in a virtual box
- For testing purposes
- Production Cluster Setup
- Kubectl
- Lets you interact with your local cluster
- A CLI tool for K8s cluster
- The API Server is the main entry point into the cluster
- You can use different clients to communicate with API Server
- UI
- API
- CLI - kubectl
- Worker processes run the commands to create and destroy pods, create services, etc
- Kubectl isn't just for minikube. It can interact with any K8s cluster
- Installation
- Minikube requires virtualization on your laptop
brew update
brew install hyperkit
brew install minikube # has kubectl as a dependency
kubernetes-cliiskubectl
minikube start --vm-driver=hyperkit
Get nodes
k get nodes
k version
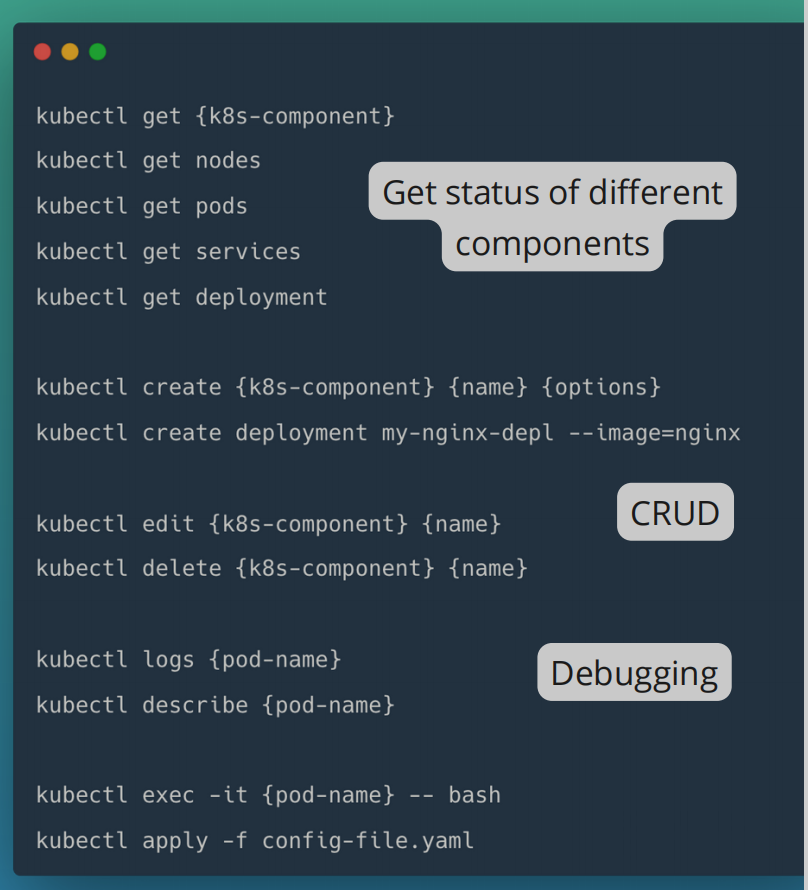
Main Kubectl Commands
Get Status of Components
- Create and Edit a Pod
- Pod is the smallest unit
- But in essence, you'll create deployments
- Deployment
- Blueprint for creating pods
- Most basic config for deployment
- Replicaset
- Manages the replicas of a pod
- In practice, you won't create or delete a replicaset
- You'll work with deployments
k get replicaset
- Layers of Abstraction
- Deployment manages a Replicaset
- Replicaset manages a Pod
- Pod is an abstraction of a container
- Everything below Deployment is handled by Kubernetes
- You can edit a deployment
- You get an autogenerated config file with default values
Describe Pod
k describe pod <pod-name>
Exec
-it: Interactive terminal- In practice, you use config files instead of the CLI
YAML Configuration file
- Also called
Kubernetes manifest - Config files are in YAML format
- They are declarative: A manifest specifies the desired state of a K8s component
- Should be stored in version control
- Has 3 parts
- Metadata
- Specification
- Attributes of spec are specific to the kind
- Status
- Automatically generated and added by K8s
- K8s gets this information from etcd, which holds the current status of any K8s component
- K8s updates state continuously
- Deployment Configuration File
- It's a bit special
- Since it's an abstraction over Pod, we have the Pod configuration inside the Deployment configuration
- Template: Has its own
metadataandspecsection - Blueprint for Pod
- Labels & Selectors
- Metadata has the labels and the spec has the selectors
- Labels
- Are key/value pairs that are attached to resources such as Pods
- used to specify identifying attributes that are meaningful and relevant to users
- Label Selectors
- Labels do not provide uniqueness
- Via the selector the user can identify a set of resources

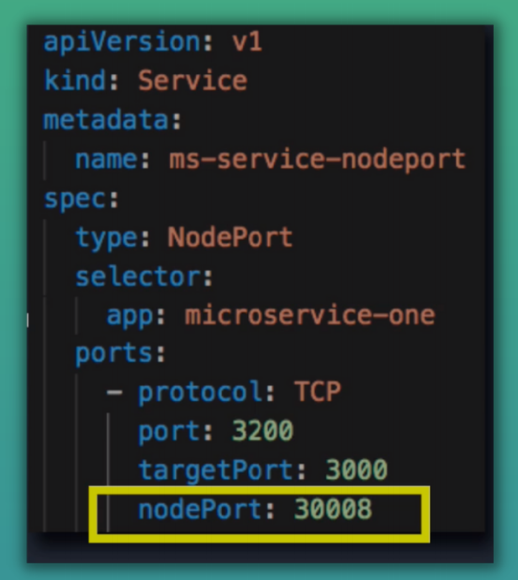
Ports in Service and Pod
- In Service, you need to specify
port- The port where the service itself is accessibletargetPort- Port, the container accepts traffic on
- In Deployment
containerPort- Port the container accepts traffic on
#More info for pods
k get pod -o wide
Get autogenerated yaml file
k get deployment <deployment-name> -o yaml

# Save into file
k get deployment <deployment-name> -o yaml > nginx-deployment-result.yaml
Apply and delete config
k apply -f file.yaml
k delete -f file.yaml
Demo: Deploying App In K8s
- Overview
- MongoDB
- Create
Internal service ConfigMapto store DB UrlSecretfor DB User and Pwd
- Create
- Mongo Express
Deployment.yamlwill haveenvvariables
- Create external service so browser can connect
- MongoDB
Get all components
k get all
Secretswill live in K8s. No one will have access to it in a repository- Need to create the
Secretbefore the deployment
Create Secret
Need values in base64
echo -n 'username' | base64
echo -n 'password' | base64
Secrets file
apiVersion: v1
kind: Secret
metadata:
  name: mongodb-secret
type: Opaque
data:
  mongo-root-username: YWxmcmVkYXNhcmU=
  mongo-root-password: UGx1c1VsdHJhMjM=
k apply -f mongo-secrets.yaml
Mongo Deployment
apiVersion: apps/v1
kind: Deployment
metadata:
  name: mongodb-deployment
  labels:
    app: mongodb
spec:
  replicas: 1
  selector:
    matchLabels:
      app: mongodb
  template:
    metadata:
      labels:
        app: mongodb
    spec:
      containers:
        - name: mongodb
          image: mongo
          ports:
            - containerPort: 27017
          env:
            - name: MONGO_INITDB_ROOT_USERNAME
              valueFrom:
                secretKeyRef:
                  name: mongodb-secret
                  key: mongo-root-username
            - name: MONGO_INITDB_ROOT_PASSWORD
              valueFrom:
                secretKeyRef:
                  name: mongodb-secret
                  key: mongo-root-password
Apply deployment file
k apply -f mongo-depl.yaml
Watch get pods command
k get pod --watch
Create internal service for MongoDB
- Can create in deployment file
---
apiVersion: v1
kind: Service
metadata:
  name: mongodb-service
spec:
  selector:
    app: mongodb
  ports:
    - protocol: TCP
      port: 27017
      targetPort: 27017
Get all components for app
k get all | grep mongodb
MongoExpress Deployment, Service & ConfigMap
- ConfigMap must already be in the cluster when referencing it
mongo-config-map.yaml
apiVersion: v1
kind: ConfigMap
metadata:
  name: mongodb-configmap
data:
  database_url: mongodb-service
mongo-express-depl.yaml
apiVersion: apps/v1
kind: Deployment
metadata:
  name: mongo-express
  labels:
    app: mongo-express
spec:
  replicas: 1
  selector:
    matchLabels:
      app: mongo-express
  template:
    metadata:
      labels:
        app: mongo-express
    spec:
      containers:
        - name: mongo-express
          image: mongo-express
          ports:
            - containerPort: 8081
          env:
            - name: ME_CONFIG_MONGODB_ADMINUSERNAME
              valueFrom:
                secretKeyRef:
                  name: mongodb-secret
                  key: mongo-root-username
            - name: ME_CONFIG_MONGODB_ADMINPASSWORD
              valueFrom:
                secretKeyRef:
                  name: mongodb-secret
                  key: mongo-root-password
            - name: ME_CONFIG_MONGODB_SERVER
              valueFrom:
                configMapKeyRef:
                  name: mongodb-configmap
                  key: database_url
Mongo Express External Service
- We create another service for mongo-express
---
apiVersion: v1
kind: Service
metadata:
  name: mongo-express-service
spec:
  selector:
    app: mongo-express
  type: LoadBalancer
  ports:
    - protocol: TCP
      port: 8081
      targetPort: 8081
      nodePort: 30000
- The type is
LoadBalancerwhich is a poor name because the internal service also acts as a LoadBalancerClusterIPis the default- Will give the service an internal IP
- LoadBalancer gives both an internal and external IP address
- The LoadBalancer assigns an external IP to the service and so accepts external requests
nodePort: Port where that external IP will be open- Range:
30000-32767
- Range:
Minikube
minikube service loadBalancerName
- When you create a db in mongo-express
- Mongo Express External Service -> Mongo Express Pod -> MongoDB Internal Service -> MongoDB Pod
Namespaces: Organizing Components
- Organise resources in namespaces
- Namespaces provide a mechanism for isolating groups of resources within a single cluster
- Names of resources need to be unique within a namespace but not across namespaces
- Like a virtual cluster within a cluster
- K8s gives 4 namespaces out of the box
- kubernetes-dashboard: only comes with minikube
- kube-system
- Do not create or modify anything here
- Has system processes and kubectl processes
- kube-public
- Publicly accessible data
- A config map which contains cluster information
kubectl cluster-info
- kube-node-lease
- Heartbeats of nodes
- Each node has an associated lease object in namespace
- Determines the availability of a node
- default
- Resources you create are located here if you haven’t created your own namespace
New namespace via kubectl
k create namespace my-ns
- Config file
Use Cases
- Group resources logically
- Instead of having all in the
defaultnamespace, could have one for database, monitoring, nginx-ingress, elastic stack - Officially
- Not for small projects or apps with less than 10 users
- Recommended
- Always a good idea to group them
- Instead of having all in the
- Isolate team resources (many teams, same application)
- To avoid conflicts
- e.g.
Project Anamespace andProject Bnamespace
- Share resources between different environments
- Staging and Development
- You have one cluster and want to host both staging and development environment in the same cluster
- When you might want to do this
- You have Nginx-Ingress Controller and Elastic Stack resources that you want both environments to share
- Blue/Green Deployment
- In the same cluster, you want to have 2 versions of the same app in production: active app and next prod version
- The apps will have differences but may require the same resources
- Staging and Development
- Limit permissions and compute resources for teams
- Limit is done per namespace
- Teams can be limited to a particular namespace to prevent unauthorised access or conflicts
Characteristics of Namespaces
-
You can't access most resources from another Namespace
- e.g. ConfigMaps, Secrets
-
Can share resources like Services
-
There are resources that can't be created within a namespace called Cluster-Wide resources
- Namespaced resources
- Most K8s resources eg. pods, services, etc are in some namespaces
- Can access service in another namespace
- Cluster-wide resources
- Live globally in a cluster
- Can't isolate them
- Low-level resources like
VolumesandNodes
- Namespaced resources
# List components that are not bound to a namespace
k api-resources --namespaced=false
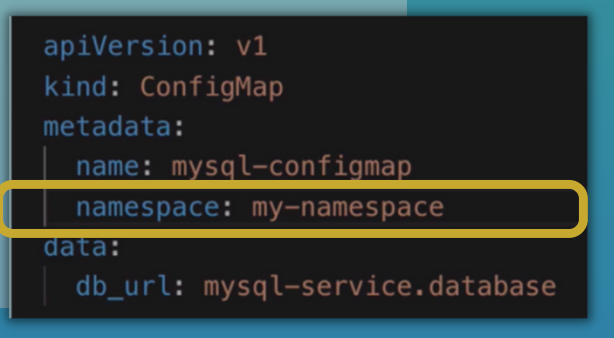
Create Components in Namespaces
# List configmaps in default namespace
k get configmap -n default

# Create component in namespace
k apply -f file.yaml --namespace=my-namespace
With Config file

k get configmap -n my-namespace
- Recommended
- Use config file over
kubectlcommand - Better documented
- More convenient
- Use config file over
Change active namespace
- Can use kubens
brew install kubectx

# Check active namespace
kubens

kubens my-namespace

kubens default
K8s Services: Connecting to applications inside the cluster
- An abstract way to expose an app running on a set of pods
- Why Service?
- Stable IP address
- Load balancing
- Loose coupling
- Within & Outside cluster
- 3 Service type attributes
- ClusterIP
- NodePort
- LoadBalancer
- ClusterIP is the default type when you don't specify a type
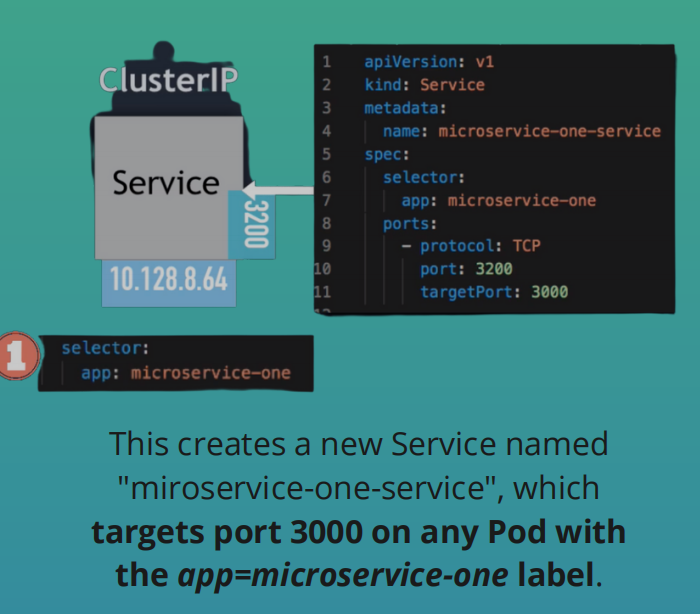
- Service defines a logical set of Pods
- The set of Pods targeted by a service is determined by a selector
ClusterIP Service & Its Subtypes
ClusterIPis an internal service not accessible from outside the cluster- All Pods in the cluster can talk to this internal service
- All nodes have an IP address range
- Pods get IP address from Node's range
Check pods IP
k get pod -o wide
- When request is made in browser
- Request is forwarded to the Pod's
ClusterIPservice throughIngress - Service is basically an abstraction of an IP address
- Service will be accessible at an IP and a port
- We define
Ingressrules that forward the request based on the request address to certain services - We define the service by its name
- The DNS resolution then maps the service name to the service's IP address
- The Service then forwards the request to one of those pods that are registered as the service endpoint
- Which pod to forward to?
- Determined by
selector - Pods are identified via
selectors - Selectors are key-value pairs
- Are basically labels
- Determined by
- Which port to forward to
- Determined by
targetPort
- Determined by
- Which pod to forward to?
- Request is forwarded to the Pod's
Service Endpoints
- When you create a service, K8s creates an
Endpointobject with its name as the service name - K8s will use the
endpointsto keep track of which Pods are members or endpoints of the service
k get endpoints
Ports
- The service
portis arbitrary targetPortmust match the port the container is listening at
Multi-Port Service
-
E.g. You have a service that accepts requests on port
27017formongodband another port on9216to accept Prometheus requests -
This is a
multi-port service -
When you have multiple ports defined, you have to name those ports
-
Multi-port Internal Service
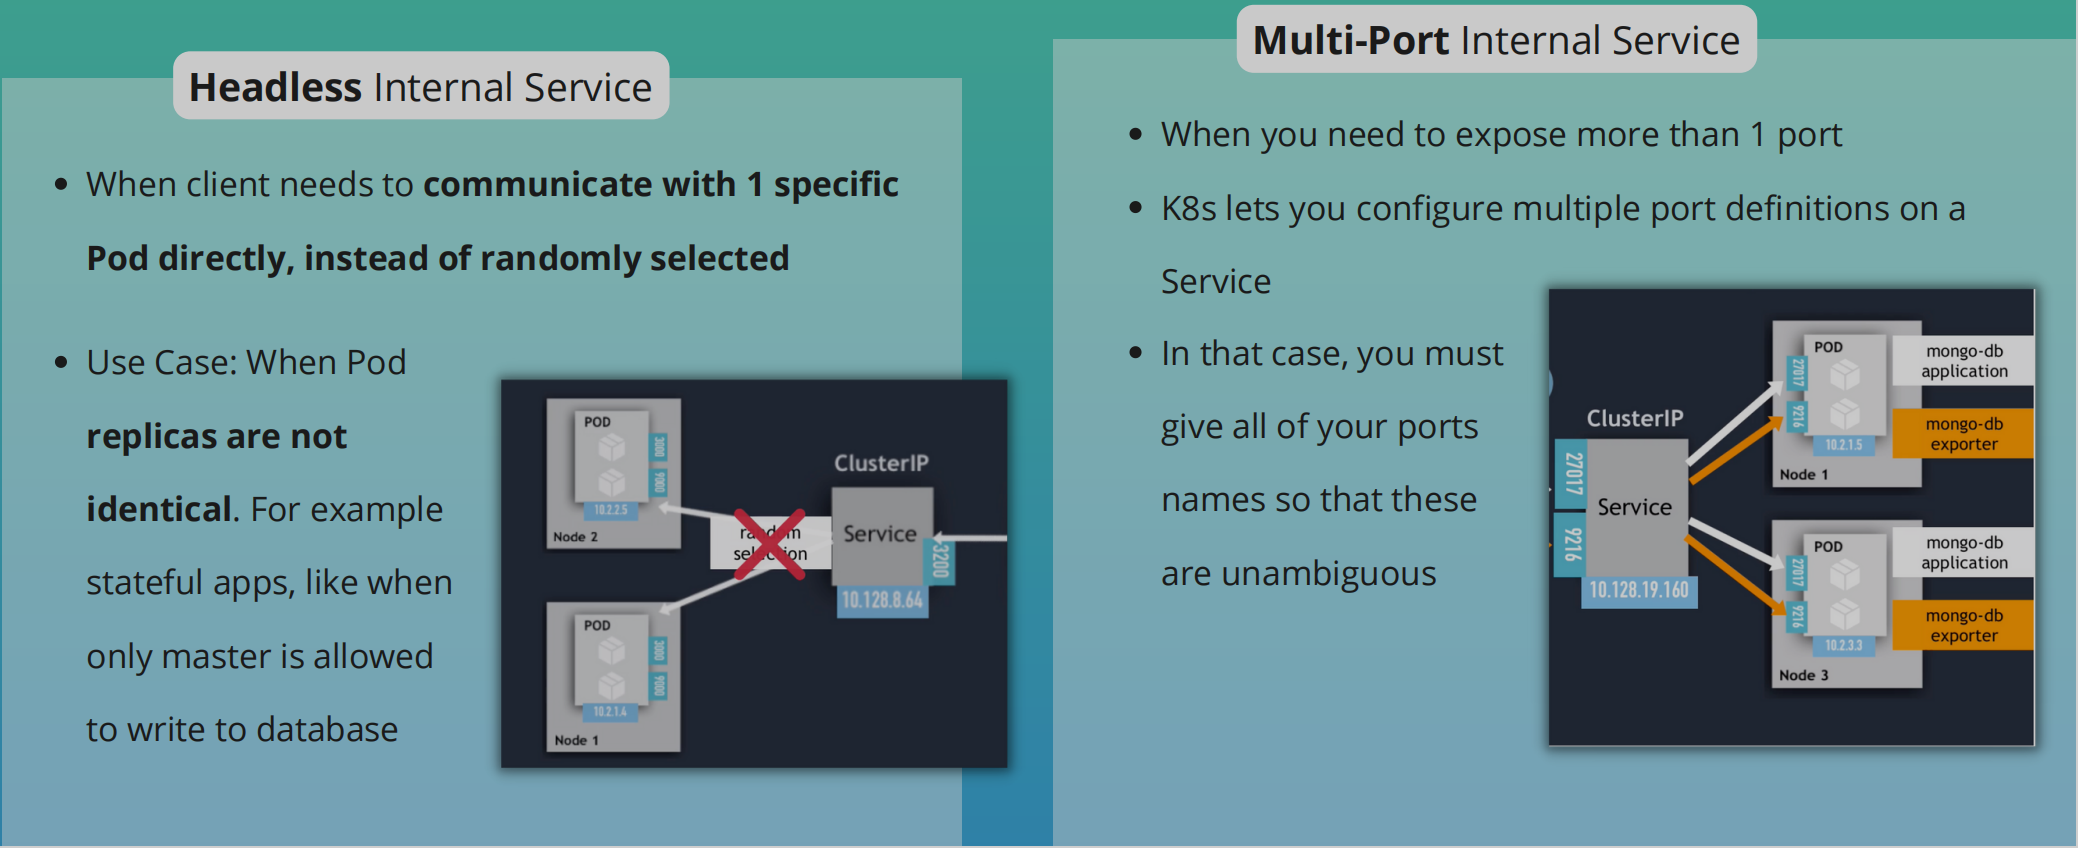
Headless Service
- Client wants to communicate with 1 specific Pod directly
- Pods want to talk directly with a specific Pod
- So not randomly selected
- Use case
- When deploying stateful apps like databases in K8s
- Pod replicas are not identical
- They have their own state
- e.g. We have a mysql app with a master instance of mysql and worker instances of the mysql app
- Only master is allowed to read and write
- The worker must connect to master to synchronise their data
- When a new worker starts it must connect to the most recent worker node to clone the data and get up to date
- To connect to each Pod individually, it needs to figure out IP addresses of each Pod
- Option 1: API call to K8s Server. Its inefficient
- Option 2: DNS Lookup
- DNS Lookup for Service - returns a single IP Address (ClusterIP)
- Set ClusterIP to "None" - returns the Pod IP address instead
- No cluster IP is assigned
- Scenario
- We'll have a normal service (ClusterIP) that handles communication between the app's pods and the mongodb pods
- In addition, we can have a headless service
- For when we want to communicate with Pods directly. eg. for database synchronisation
NodePort Service
- Unlike internal service, its accessible directly from outside the cluster
- Exposes the Service on each Node's IP at a static port
- Creates a service that is accessible on a static port on each worker node in the cluster
- ClusterIP is only accessible within the cluster itself
- External traffic has access to fixed port on each worker node
- The browser request comes straight to worker node instead of Ingress
- NodePort range:
30000 - 32767 - URL -
IP address of Worker Node: nodePort - When we create a NodePort, a ClusterIP Service, to which the NodePort Service routes is automatically created
- Spans all Worker Nodes
- If you have 3 pod replicas across 3 nodes the service will be able to handle the request coming on any of the worker nodes and forward it to one of the replicas
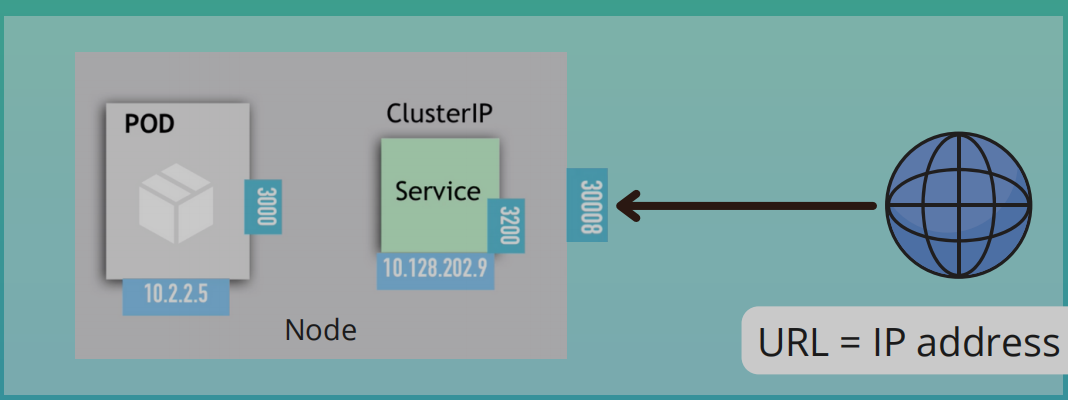
- Not Secure: External traffic has access to fixed port on each Worker Node
Loadbalancer Service
- Exposes the Service externally using a cloud provider's load balancer
NodePortandClusterIPservices to which the external load balancer routes are automatically created- More secure, more efficient with 1 entry point
LoadBalanceris an extension of theNodePortServiceNodePortService is an extension of theClusterIPService
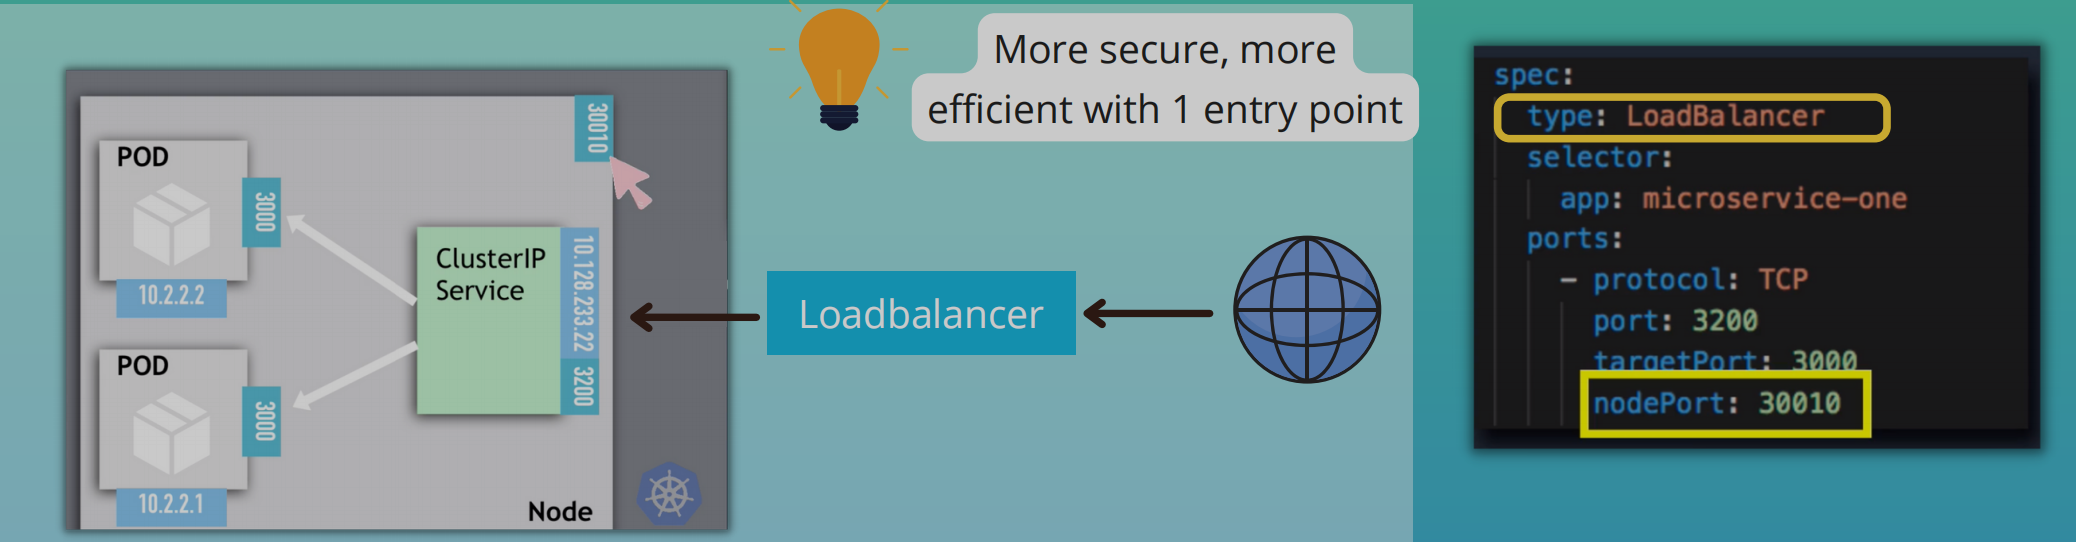
- In production, don't use
NodePortfor external connections - You'll use
IngressorLoadBalancerfor production environments
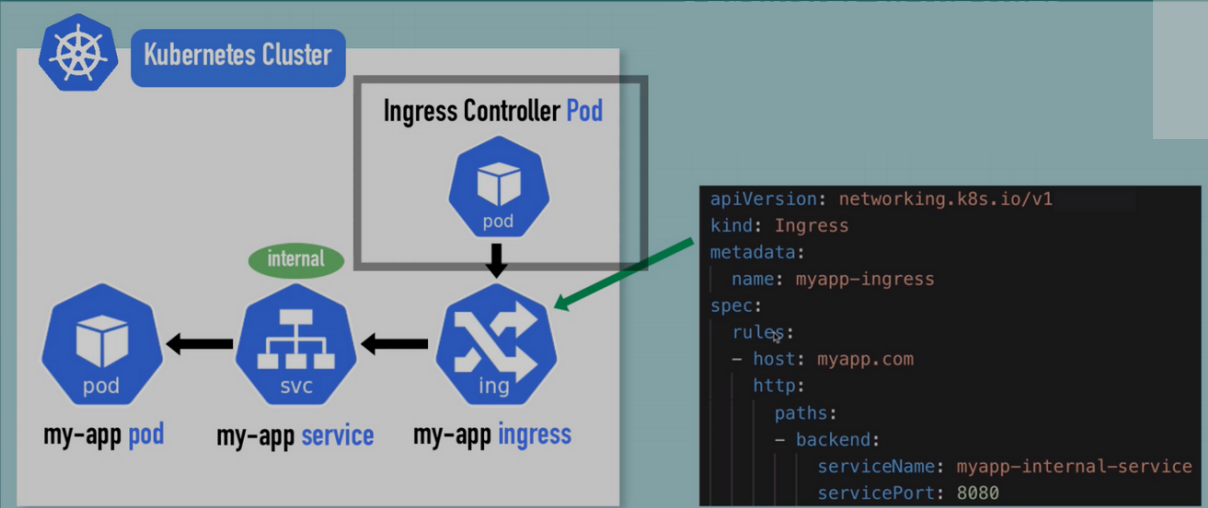
Ingress: Connecting to applications outside the cluster
- External services are a way to access applications in K8s from outside
- In production, a better alternative is Ingress
- Not a service type but acts as the entry pint for your cluster
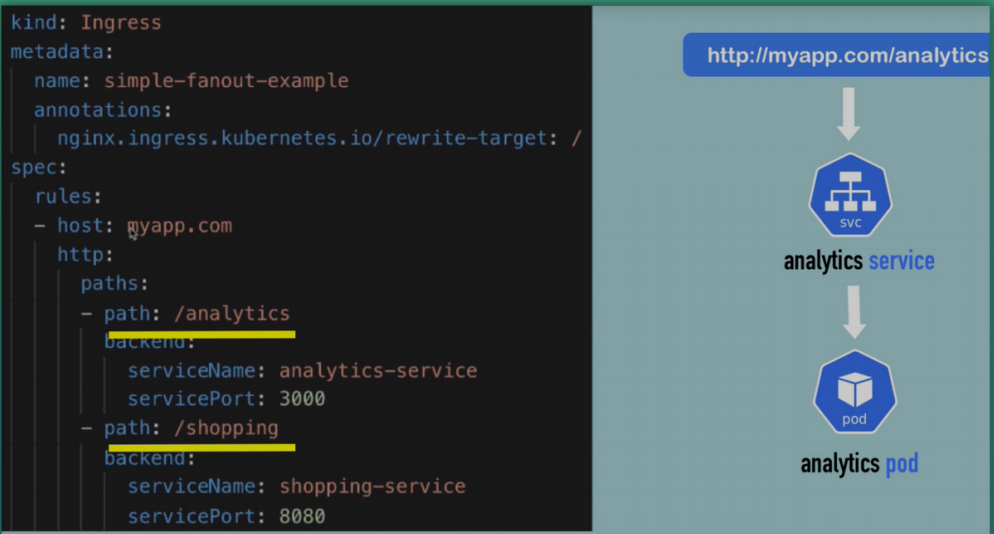
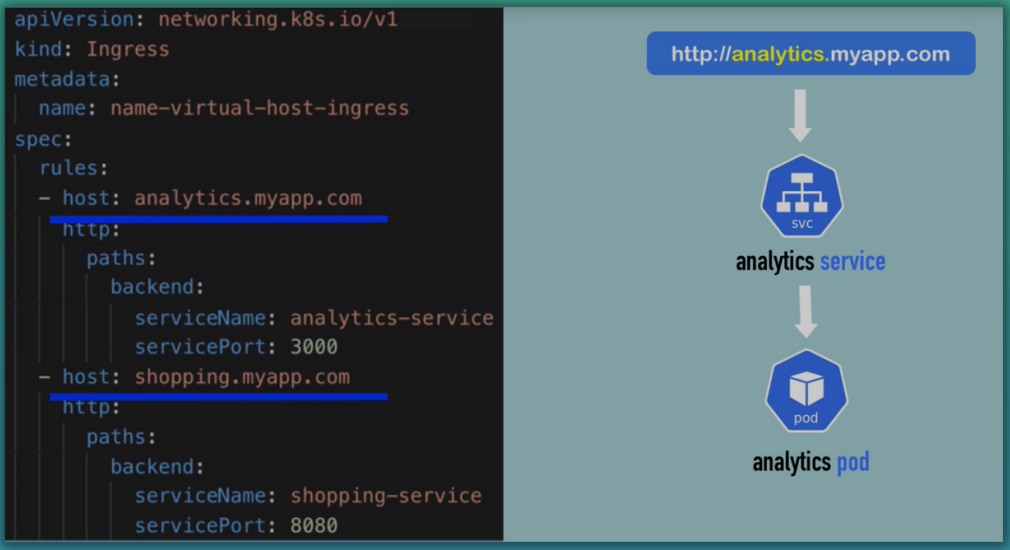
- More intelligent and flexible: Let's you consolidate your routing rules into a single resource as it can expose multiple services under the same IP address
- Has routing rules which forward requests to internal services
- Can configure
- Multiple sub-domains or domains
- Multiple paths for the same host
- TLS (SSL Cert)
Ingress and Internal Service Configuration
Ingress routing rules example
apiVersion: networking.k8s.io/v1
kind: Ingress
metadata:
  name: dashboard-ingress
  namespace: kubernetes-dashboard
spec:
  rules:
  - host: dashboard.com
    http:
      paths:
      - backend:
          serviceName: kubernetes-dashboard
          servicePort: 80
http: Does not correspond to http in the urlbackend: Target where the request is redirected- The
serviceNameshould correspond to the service name - The
servicePortshould correspond to the internal service port- Internal services don't require the
nodePort- Default type is
ClusterIP
- Default type is
- Internal services don't require the
Host- Valid domain address
- Map domain name to Node's IP address, which is the entrypoint
How to configure Ingress In Your Cluster
- You need an implementation for
Ingress - What is an
Ingress Controller?- A pod or set of pods that evaluates and processes ingress rules
- Ingress Controller
- Evaluates all the rules
- Manages redirections
- Entry point into cluster
- Many 3rd party implementations
- We'll use K8s Nginx Ingress Controller
- Before Ingress Controller, you still need 1 load balancer
- Option 1 - Cloud Service Provider
- Have out-of-the-box K8s solutions
- Request goes to load balancer and it forwards requests to the Ingress Controller Pod
- Option 2 - Bare Metal
- Need to configure some kind of entry point. Either inside the cluster or outside as a separate server
- Could be an external Proxy server: Hardware or software solution
- Will be a separate server
- Will give it a public IP address and open ports
- Proxy server will act as an entry point to the cluster
- No server in K8s cluster will be accessible from the outside
- Option 1 - Cloud Service Provider
Configure Ingress in Minikube
minikube addons enable ingress
- Create ingress rule after starting ingress
dashboard-ingress.yaml
apiVersion: networking.k8s.io/v1
kind: Ingress
metadata:
  name: dashboard-ingress
  namespace: kubernetes-dashboard
spec:
  rules:
    - host: dashboard.com
      http:
        paths:
          - backend:
              service:
                name: kubernetes-dashboard
                port:
                  number: 80
k apply -f dashboard-ingress.yaml
k get ingress -n kubernetes-dashboard
- Take allocated address
vim /etc/hosts

#Add
IP URL
Docker desktop's K8s dashboard
- Grab the most current script from the install instructions: https://kubernetes.io/docs/tasks/access-application-cluster/web-ui-dashboard/#deploying-the-dashboard-ui: As of today, the kubectl apply command looks like this:
kubectl apply -f https://raw.githubusercontent.com/kubernetes/dashboard/v2.5.0/aio/deploy/recommended.yaml
- Create a dash-admin-user.yaml file and paste the following:
apiVersion: v1
kind: ServiceAccount
metadata:
  name: admin-user
  namespace: kubernetes-dashboard
-
Apply the dash-admin-user configuration:
kubectl apply -f dash-admin-user.yaml -
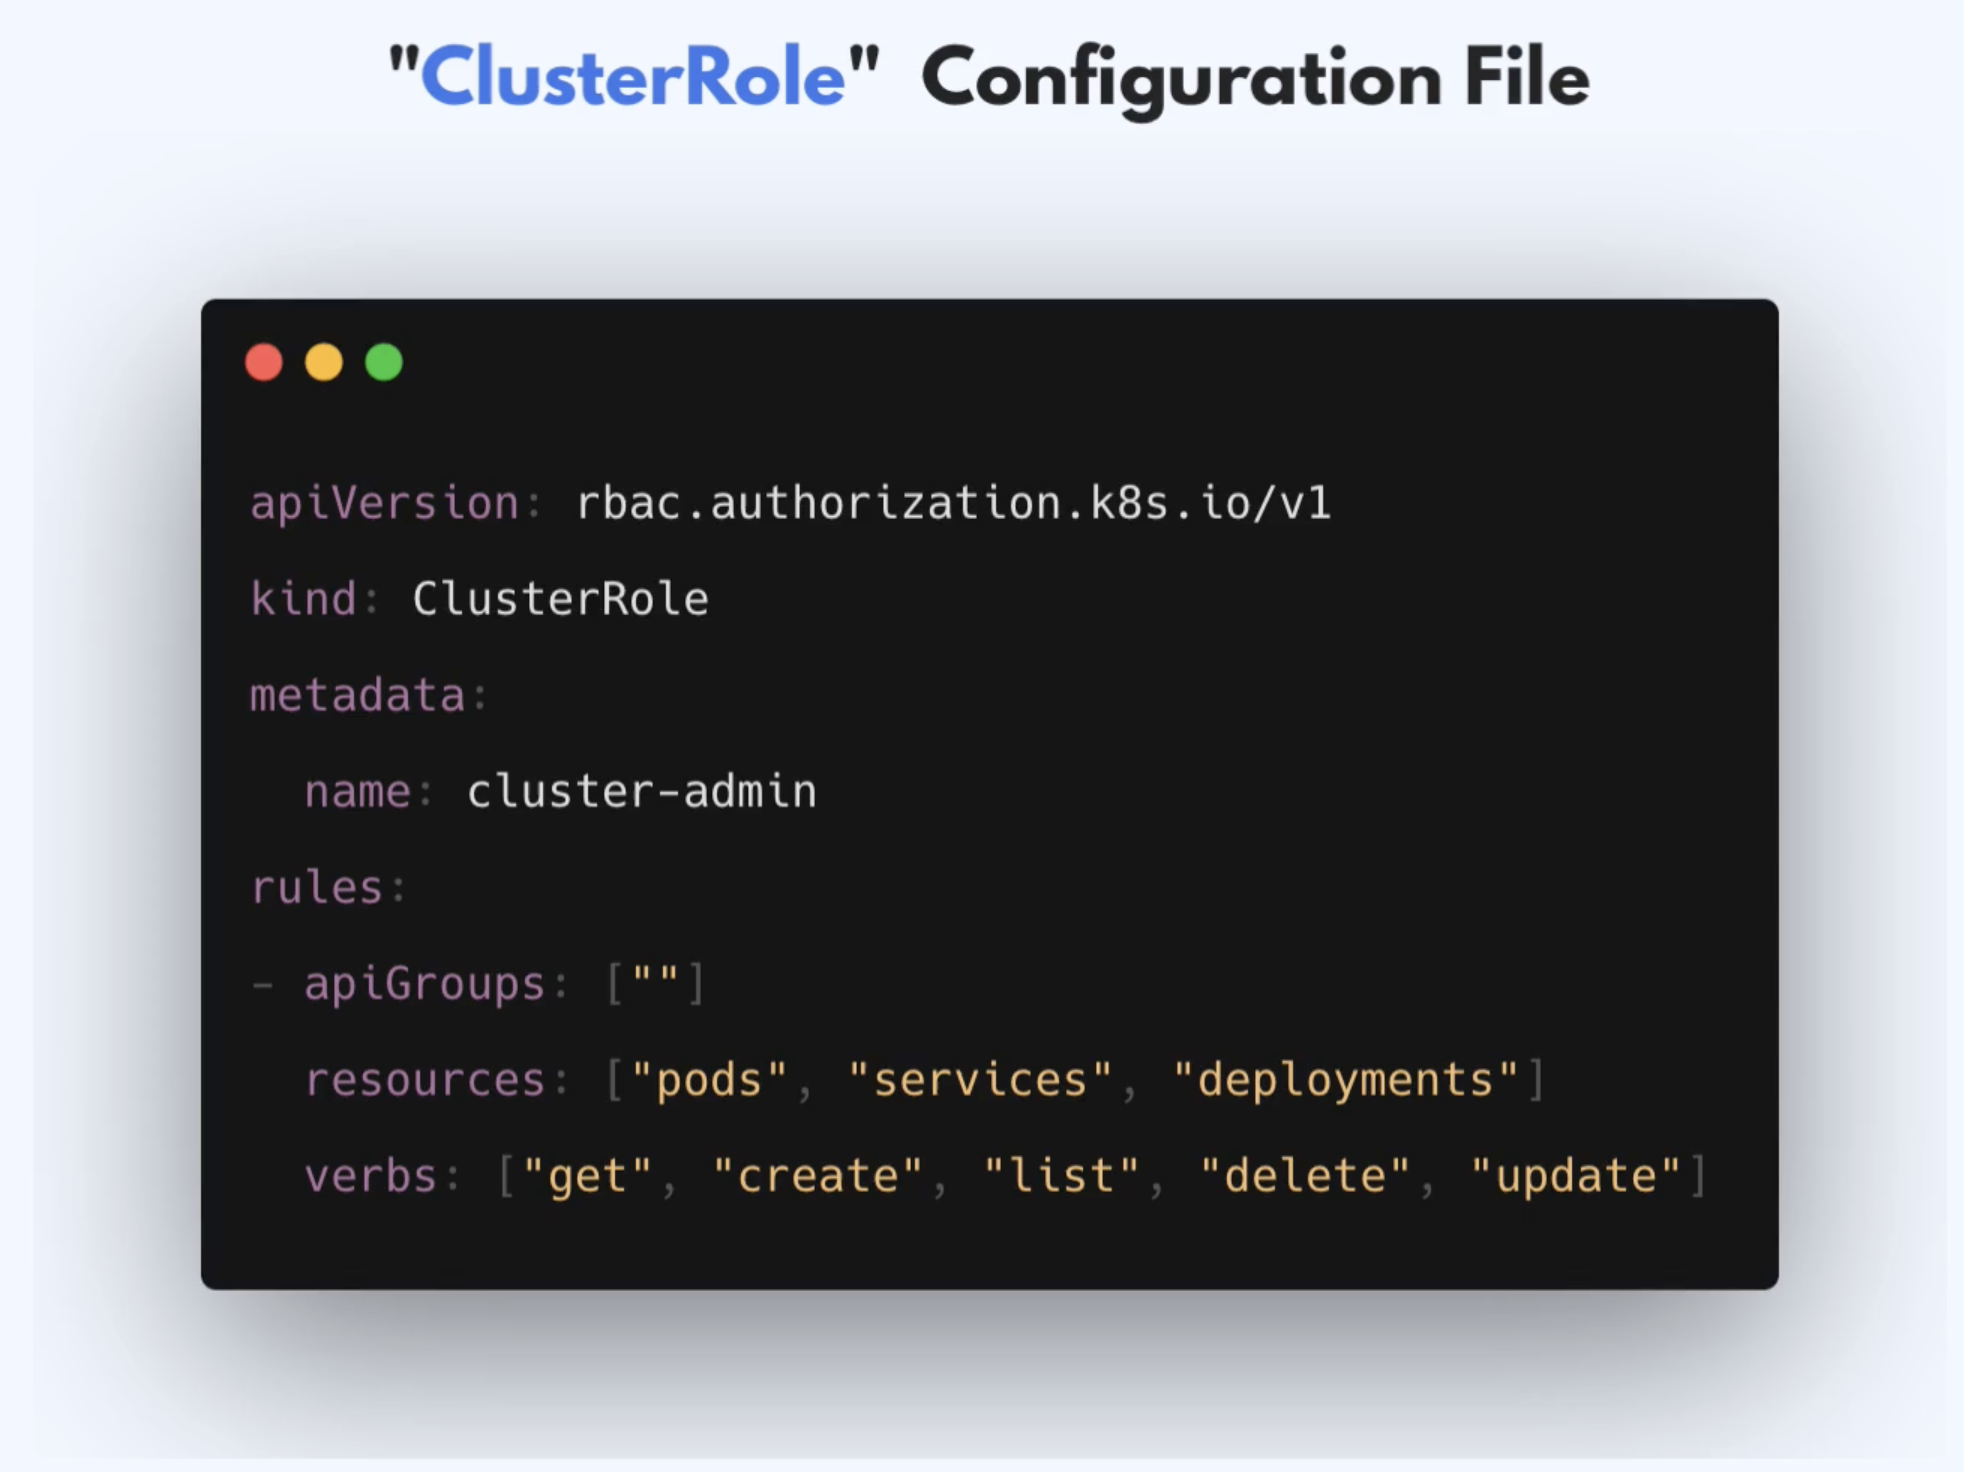
Create
dash-clusterrole-yamlfile and paste the following:
apiVersion: rbac.authorization.k8s.io/v1
kind: ClusterRoleBinding
metadata:
  name: admin-user
roleRef:
  apiGroup: rbac.authorization.k8s.io
  kind: ClusterRole
  name: cluster-admin
subjects:
  - kind: ServiceAccount
    name: admin-user
    namespace: kubernetes-dashboard
-
Apply the ClusterRole configuration:
kubectl apply -f dash-clusterrole.yaml -
In the terminal, run
kubectl proxy -
Visit the following URL in your browser to access your Dashboard: http://localhost:8001/api/v1/namespaces/kubernetes-dashboard/services/https:kubernetes-dashboard:/proxy/
-
Obtain the token for this user by running the following in your terminal:
- First, run
kubectl versionin your terminal. - If your Kubernetes server version is
v1.24or higher you must run the following command:
kubectl -n kubernetes-dashboard create token admin-user
- If your Kubernetes server version is older than
v1.24you must run the following command:kubectl -n kubernetes-dashboard get secret $(kubectl -n kubernetes-dashboard get sa/admin-user -o jsonpath="{.secrets[0].name}") -o go-template="{{.data.token | base64decode}}"
-
Copy the token from the above output and use it to log in at the dashboard.Be careful not to copy any extra spaces or output such as the trailing % you may see in your terminal.
-
After a successful login, you should now be redirected to the Kubernetes Dashboard.
The above steps can be found in the official documentation.
Ingress default backend
- Ingress has a default backend
- Whenever a request comes into the cluster that is not mapped to any backend or rule, then the default backend is used to handle the request
- Can be used to define custom error messages
k describe ingress dashboard-ingress -n kubernetes-dashboard
Configure Default Backend
apiVersion: v1
kind: Service
metadata:
  name: default-http-backend
spec:
  selector:
    app: default-response-app
  ports:
    - protocol: TCP
      port: 80
      targetPort: 8080
- Create a Pod that creates that custom error response
More Use Cases
-
Multiple paths for the same host
-
Multiple sub-domains or domains
-
TLS
-
Secret holds the TLS certificate
-
There is a type of secret called TLS
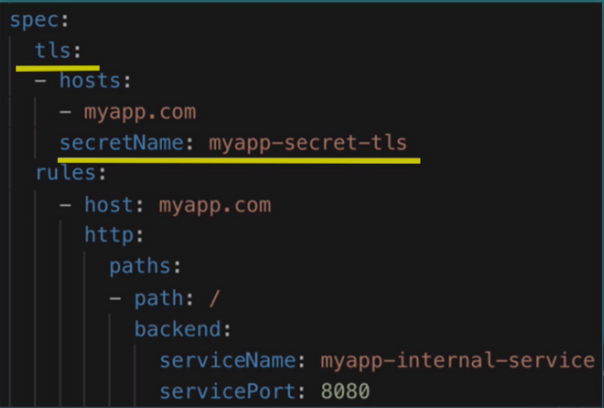
TLS
apiVersion: v1
kind: Secret
metadata:
    name: myapp-secret-tls
    namespace: default
data:
    tls.crt: base64 encoded cert
    tls.key: base64 encoded key
type: kubernetes.io/tls
- Values are the file contents NOT file paths
- Secret component must be in the same namespace as the Ingress component
Persisting data with volumes
- K8s offers no data persistence out of the box
- At its core, a volume is a directory (with some data in it), which is accessible to the containers in a Pod
- K8s supports many types of volumes
- Ephemeral volume types have a lifetime of a Pod
- Persistent volume types exist beyond the lifetime of a Pod
- Storage Requirements
- Storage that doesn't depend on pod lifecycle
- Storage must be available on all Nodes
- Storage needs to survive even if cluster crashes
- The way to persist data in K8s is with these 3 resources:
- Persistent Volume (PV)
- Storage in the cluster that has been provisioned by an administrator or dynamically provisioned using
Storage Classes
- Storage in the cluster that has been provisioned by an administrator or dynamically provisioned using
- Storage Class (SC)
SCprovisionsPVdynamically whenPVCclaims it
- Persistent Volume Claim (PVC)
- A request for storage by a user
- Similar to Pods.
- While Pods consume node resources,
PVCsconsumePVresources
- Persistent Volume (PV)
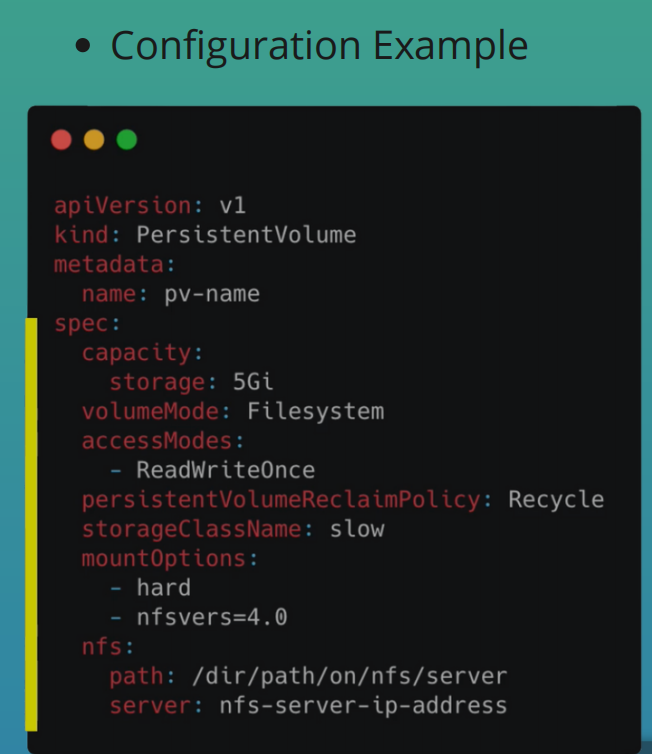
Persistent Volume
- Think of it as a cluster resource. Just like RAM or CPU that is used to stored data
- Created with YAML file
- Gets storage from actual physical storage
- Persistent Volumes are not namespaced so PV resources are accessible to the whole cluster
- Depending on the storage type, spec attributes differ
- In the official docs you can find a complete list of storage backends supported by K8s
- In K8s, you create and manage storage by yourself
- Think of storage as an external plugin to your cluster
- Types
- Cloud
- Local
- NFS - Network File System
- Local vs Remote Volume Types
- Each volume type has its own use case
- Local volume types violate 2 and 3
- Being tied to 1 specific Node
- Not surviving cluster crashes
- For DB persistence use remote storage
Who Creates Persistent Volumes
- PV have to be in the cluster before the Pod that uses it is created
- 2 main roles in K8s
- K8s Admin eg. System Admins or DevOps Eng
- Sets up cluster and maintains it
- Makes sure cluster has enough resources
- K8s User
- Deploys applications to cluster
- K8s Admin eg. System Admins or DevOps Eng
- K8s admin configures and creates storage
- Make sure NFS storage is created and configured or
- Make sure cloud storage is configured
- They also create the PV components from these storage backends
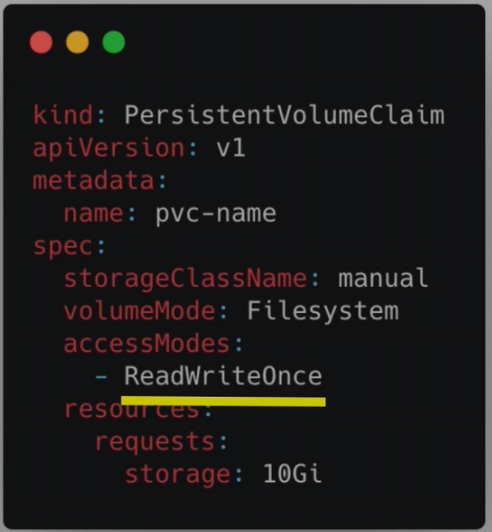
Persistent Volume Claims
- Request for Storage by a user
- Application has to claim the PV
- Whatever PV matches the criteria will be used
- You also have to use the claim in your app's configuration
- All the Pods and containers will then have access to the PV storage
spec:
    volumes:
      - name: mypd
        persistentVolumeClaim:
            claimName: pvc-name
- Claims can request specific size and access modes
- e.g. They can be mounted ReadWriteOnce, ReadOnlyMany or ReadWriteMany
Level of Volume Abstractions
- Pods access storage by using the claim as a volume
- Claim tries to find a volume in cluster
- Volume has the actual storage backend
- Claims must be in the same namespace as the Pod using that claim
- When the
PVis found- The volume is mounted into the Pod
- Which in turn is mounted into the container for use
- Can mount volume in all containers or some of them
- Why abstractions?
- Admin provisions storage resource
- User creates claim to
PV - Developers don't need to bother about where files or application data are stored. They just need to deploy their app
- Basically makes deployment easier for developers
ConfigMap and Secret
- Also volume types
- Are local volumes not created via
PVorPVC - Managed by
K8s - How it works
- Create ConfigMap and/or Secret component
- Mount that into your pod/container
Different Volume Types In a Pod
- A pod can use multiple volumes of different types simultaneously
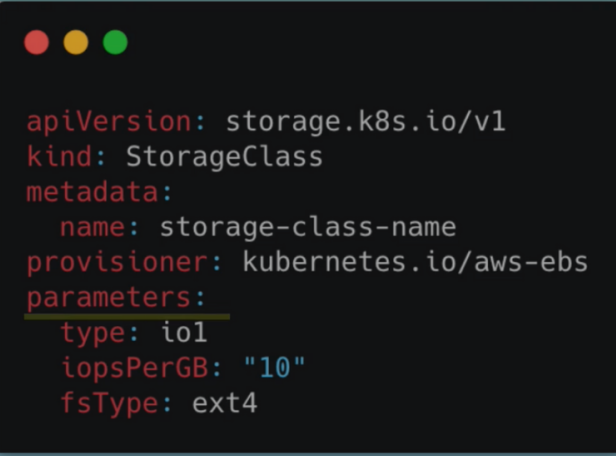
Storage Class
- Consider a cluster with hundreds of apps
- Devs have to ask admins to create
PVs for apps - Admins have to manually request storage from cloud provider or by whichever means and create
PVs for all those apps - Can be tedious and time-consuming
- Devs have to ask admins to create
- Storage Class provisions
PVdynamically wheneverPVCclaims it - Also created with YAML config
- Storage Class Usage
- Pod claims storage via
PVC PVCrequests storage fromSCSCcreatesPVthat meets the needs of theClaim
- Pod claims storage via
StorageBackendis defined in theSCresource- via
provisionerattribute - each
storage backendhas its ownprovisioner- internal provisioner - "kubernetes.io"
- external provisioner
- configure params for storage we want to request for PV
- via
Configmap and secret volume types
- When to use
ConfigMapandSecretVolumes?- Applications that required some config files before they start
- Prometheus
- Elasticsearch
- Mosquitto
- Nginx
- Your own js or Java app may require an
app.propertiesfile
- Applications that required some config files before they start
- How to pass files to K8s Pods
- Many services will need config files
ConfigMapsandSecretsare used to store external config of individual values
Previously
secrets.yaml
apiVersion: v1
kind: Secret
metadata:
  name: mongodb-secret
type: Opaque
data:
  mongo-root-username: YWxmcmVkYXNhcmU=
  mongo-root-password: UGx1c1VsdHJhMjM=
config-map.yaml
apiVersion: v1
kind: ConfigMap
metadata:
  name: mongodb-configmap
data:
  database_url: mongodb-service
depl.yaml
apiVersion: apps/v1
kind: Deployment
metadata:
  name: mongodb-deployment
  labels:
    app: mongodb
spec:
  replicas: 1
  selector:
    matchLabels:
      app: mongodb
  template:
    metadata:
      labels:
        app: mongodb
    spec:
      containers:
        - name: mongodb
          image: mongo
          ports:
            - containerPort: 27017
          env:
            - name: MONGO_INITDB_ROOT_USERNAME
              valueFrom:
                secretKeyRef:
                  name: mongodb-secret
                  key: mongo-root-username
            - name: MONGO_INITDB_ROOT_PASSWORD
              valueFrom:
                secretKeyRef:
                  name: mongodb-secret
                  key: mongo-root-password
- This is one use case of ConfigMaps and Secrets
- However these are individual values and not file
- With ConfigMaps and Secrets, you can create
- Individual key-value pairs
- Create files that can be mounted into the Pod and then into the container to access the data
- Mosquitto Demo
- Its a message broker
- We'll be
- Overwriting mosquitto.conf
- Adding passwords file
- We'll use these two files and mount them into the mosquitto Pod
- The
ConfigMapandSecretsmust be created before you can use them in your Pod
mosquitto-config-components.yaml
apiVersion: v1
kind: ConfigMap
metadata:
  name: mosquitto-config-file
data:
  mosquitto.conf: |
    log_dest stdout
    log_type all
    log_timestamp true
    listener 9001

---
apiVersion: v1
kind: Secret
metadata:
  name: mosquitto-secret-file
type: Opaque
data:
  secret.file: |
    c29tZXN1cGVyc2VjcmV0IGZpbGUgY29udGVudHMgbm9ib2R5IHNob3VsZCBzZWU=

---
apiVersion: apps/v1
kind: Deployment
metadata:
  name: mosquitto
  labels:
    app: mosquitto
spec:
  replicas: 1
  selector:
    matchLabels:
      app: mosquitto
  template:
    metadata:
      labels:
        app: mosquitto
    spec:
      containers:
        - name: mosquitto
          image: eclipse-mosquitto:1.6.2
          ports:
            - containerPort: 1883
          volumeMounts:
            - name: mosquitto-conf
              mountPath: /mosquitto/config
            - name: mosquitto-secret
              mountPath: /mosquitto/secret
              readOnly: true
      volumes:
        - name: mosquitto-conf
          configMap:
            name: mosquitto-config-file
        - name: mosquitto-secret
          secret:
            secretName: mosquitto-secret-file

---
apiVersion: apps/v1
kind: Deployment
metadata:
  name: mosquitto
  labels:
    app: mosquitto
spec:
  replicas: 1
  selector:
    matchLabels:
      app: mosquitto
  template:
    metadata:
      labels:
        app: mosquitto
    spec:
      containers:
        - name: mosquitto
          image: eclipse-mosquitto:1.6.2
          ports:
            - containerPort: 1883
mountPathdepends on the application- The concept of mounting config and secrets in the Pod before mounting it in the container is useful for multiple containers
- You can control which containers get access to which volumes
- ConfigMap and Secret are Local Volume Types
StatefulSet: Deploying stateful applications
- Used to manage stateful applications like databases or apps that store data to keep state
- Manages the deployment and scaling of a set of Pods and provides guarantees about the ordering and uniqueness of these Pods
- Stateless Apps
- Doesn't depend on previous data
- Deployed using
Deployment
- Stateful Apps
- Update data based on previous data
- Query data
- Depends on most up-to-date/state
- Both manage Pods based on container specifications
- Can configure storage equally in the same way
Deployment vs StatefulSet
- Unlike a Deployment, a StatefulSet maintains a sticky identity for each of their Pods
- These pods are created from the same spec, but are not interchangeable: each has a persistent identifier that it maintains across any rescheduling
- Pods from StatefulSet
- More difficult
- Can't be created/deleted at the same time
- Can't be randomly addressed
- Pods have fixed ordered names
- Pods from Deployment
- Identical and interchangeable
- Created in random order with random hashes
- 1 Service that load balances to any Pod
Why do the StatefulSet Pods have identities
- Scalable database apps
- Scenario
- Single mysql pod can be used for reading and writing data
- Adding a second one adds some complications because we cannot allow both Pods to read and write to the db since this can create Db inconsistencies
- The second Pod can read just fine but not write to the db
- There is a mechanism that prevents other Pods from writing to the db
- The Pod that can write is called the
Master. The others are calledslavesorWorker Nodes - The Pods don't have access to the same storage
- They each have their own replicas of the storage that they can access
- Each Pod replica needs to have the same data as the other. This means they have to continuously synchronize their data
- The
Slaves/Workersmust know about each change in order to be up to date - When a new Pod replica joins the set up, it clones the data from the previous Pod and starts continuous synchronization once it has all the data
- PV lifecycle isn't tied to the lifecycle of other components
- You can configure Persistent Volumes for your stateful set
- Each Pod has its own PV which stores data and its own state (whether its a Master)
- When a StatefulSet Pod dies and is replaced by a new Pod, the persistent Pod identifiers make sure that the storage volume gets reattached to the replacement Pod
- For reattachment to work, you have to use a remote storage
- Because if the Pod gets rescheduled from one node to another Node, the previous storage must be available on the other Node as well
- You cannot do that using Local Volume Storage because they are tied to a particular Node
- Fixed ordered names
- Scenario
$(stateful name)-$(ordinal)
- If you're creating 3 StatefulSet replicas and the first one fails to create, the other Pods won't get created at all
- The next Pod is only created if the previous one is up and running
- Deletion is in reverse order
- It starts from the last Pod
- Each Pod gets its own DNS endpoint from a Service
- The Pods also have their own individual DNS names
${pod name}.${governing service domain}
-
2 characteristics
- Predictable pod name
- Fixed individual DNS name
-
When Pod restarts
- IP address changes
- Name and endpoint stays the same
-
Sticky Identity
- Retain state
- Retain Role
-
Replicating stateful apps is complex
-
Need to do a lot yourself
- Configuring the cloning and data synchronization
- Make remote storage available
- Managing and back-ups
-
Stateful apps are not perfect for containerized environments
-
Stateless are perfect for Docker and K8s
Managed K8s services explained
- Use case
- Web app with database
- Available from browser with
https - Security for cluster
- Data persistence for DB
devandprodenvironment- App runs in K8s cluster
Managed Vs Unmanaged K8s Cluster
- K8s on Cloud
- Can spin up 6 linode servers
- Install master processes on 3 nodes
- API server
- Scheduler
- Controller manager
- etcd
- Install node processes on the other 3 nodes
- Container runtime
- Kubelet
- Kube proxy
- After this you have a cluster and you can deploy your application on there
- You need to manage everything
- Is a huge overhead
- Not practical when you want to setup things fast and easy
- Install master processes on 3 nodes
- Can spin up 6 linode servers
- Cloud Providers Managed K8s services
- On Linode, called Linode K8s Engine (LKE)
- You don't create a cluster from scratch
- When you create a cluster
- You choose how many worker nodes you want with everything pre-installed
- Master Nodes are created and managed by the Cloud Provider in the background
- You only pay for Worker Nodes
- Less time and effort
Managed K8s Cluster
- LKE as example
- Spin up K8s cluster on cloud
- choose worker nodes and resources
- select region/data center
- Connect using kubectl to deploy your app
- Data Persistence for Cluster : Scenario
- Deploying mongodb for your JS apps
- Database apps need data persistence
- If you have 3 replicas, you need persistence for all 3 replicas
- Types of storage
- Cloud storage
- NFS
- Local storage
- You have to configure it yourself
- Steps
- Create physical storage
- Create persistent volume
- Attach volumes to your db
- On Linode
- There's Linode Block Storage
- You can use Linode's Storage Class
- It creates
- Persistent volumes
- With physical storage automatically
- When you deploy your app, the storage is attached to your database
- Spin up K8s cluster on cloud
- Load balancing your K8s cluster
- Scenario
- Node.js app running in cluster
- MongoDB App
- Storage Configured
- Need services and Ingress enable access from browser
- Ingress is part of K8s
- manages routing of incoming requests
- Incoming requests are routed to internal services
- You'll need to install and run Ingress Controller in K8s Cluster and configure Ingress rules that will then route the incoming traffic to the NodeJS app
- How does this work in Managed K8s Service or LKE specifically?
- It happens through Linode's LoadBalancer
- Cloud Provider's have their own LoadBalancer implementations which is the entry point to your cluster. Serves as the load balancer for your Worker Nodes (Linode server instances)
- Don't direct traffic straight through to your web app's server directly. It won't scale
- Server will go down when updating
- Place LoadBalancer in front of Cluster that directs requests traffic to the web server
- The LoadBalancer will get the public IP address and the web server will be hidden away with a private IP
- Can add multiple web servers that the load balancer can forward requests to
- You can scale your app up and down without users even noticing anything
- You have entry point that you set up once
- LoadBalancer can configure session stickiness
- Route subsequent requests for same client (authenticated) to the same backend
- So the same client will always access the same backend
- Can configure LoadBalancer with SSL certificate to secure connections
- Can configure with
cert-manager- Can get the cert and store it as a K8s Secret and use it to secure the connection to your cluster
- Scenario
- Data centres for the K8s cluster
- Host app in closer proximity to your users
- Linode has DC in 11 availability zones
- Move app from one cloud to another
- Scenario
- Migrate part of app to a private cloud
- Migrate part of your app to another cloud platform
- When using a cloud provider, you use services specific to that cloud provider. eg. NodeBalancer on Linode
- Your app get tightly coupled to the cloud provider. Its called
Vendor Lock-In
- Scenario
- Automating tasks
- Your setup grows
- Your infrastructure configuration gets more complex
- Your DevOps team grows
- You'll want to automate as much as possible
- Creating
- Configuring
- Deployment
- Can use automation tools to automate your infrastructure and deployment of services in infrastructure
- .e.g. Terraform or Ansible
Helm Package Manger
- Its a package manager for Kubernetes
- Like
apt,yum, orhomebrew - Convenient way to package YAML files and distribute them in public and private repositories
- Like
- Scenario
- You have deployed your app in K8s
- You want to add Elastic Stack for logging. You'll require
- StatefulSet
- ConfigMap
- Secret
- K8s user with permissions
- Services
- If you were to create each file manually it will be a tedious
- The process for deploying Elastic Stack is pretty standard
- Someone has already created these files and packaged them or bundled them up
- That bundle of YAML files is called a
Helm Chart
Helm Chart
- Bundle of YAML files
- Create your own Helm Charts with Helm
- Push them to Helm Repository
- Download and use existing Helm Charts
- Can reuse config that someone has already made
- Finding charts
helm search <keyword>- Helm hub
- Apart from public registries, there are also private registries
- Helm is also a templating engine
- Scenario
- You're creating identical microservices that look have the same Deployments and Services. Only the name and versions differ
- Without Helm, you'll have a config file for each microservice
- Using Helm, you can define a blueprint for the microservices
- Dynamic values are replaced by placeholders
- You'll use a template YAML config file
- You'll define values in a values.yaml
- Scenario
kind: Pod
metadata:
    name: {{ .Values.name }}
spec:
    containers:
    - name: {{ .Values.container.name }}
      image: {{ .Values.container.image }}
      port: {{ .Values.container.port }}
values.yaml
name: my-app
container:
    name: app-container
    image: app-image
    port: 9000
.Valuesis an Object which is being created based on values defined either viaYAMLfile or with--setflag- Practical for CI/CD
- In your build, you can replace values on the fly before deploying them
- Another use for Helm is deployment of the same applications across different environments
- Scenario
- You have a microservice app that you want to deploy on
dev,stagingandprod - Instead of deploying the yaml files separately on each cluster
- You can package them to make your own application Chart that the deployment needs and you can use it to redeploy the same app to different environments
Helm Chart Structure
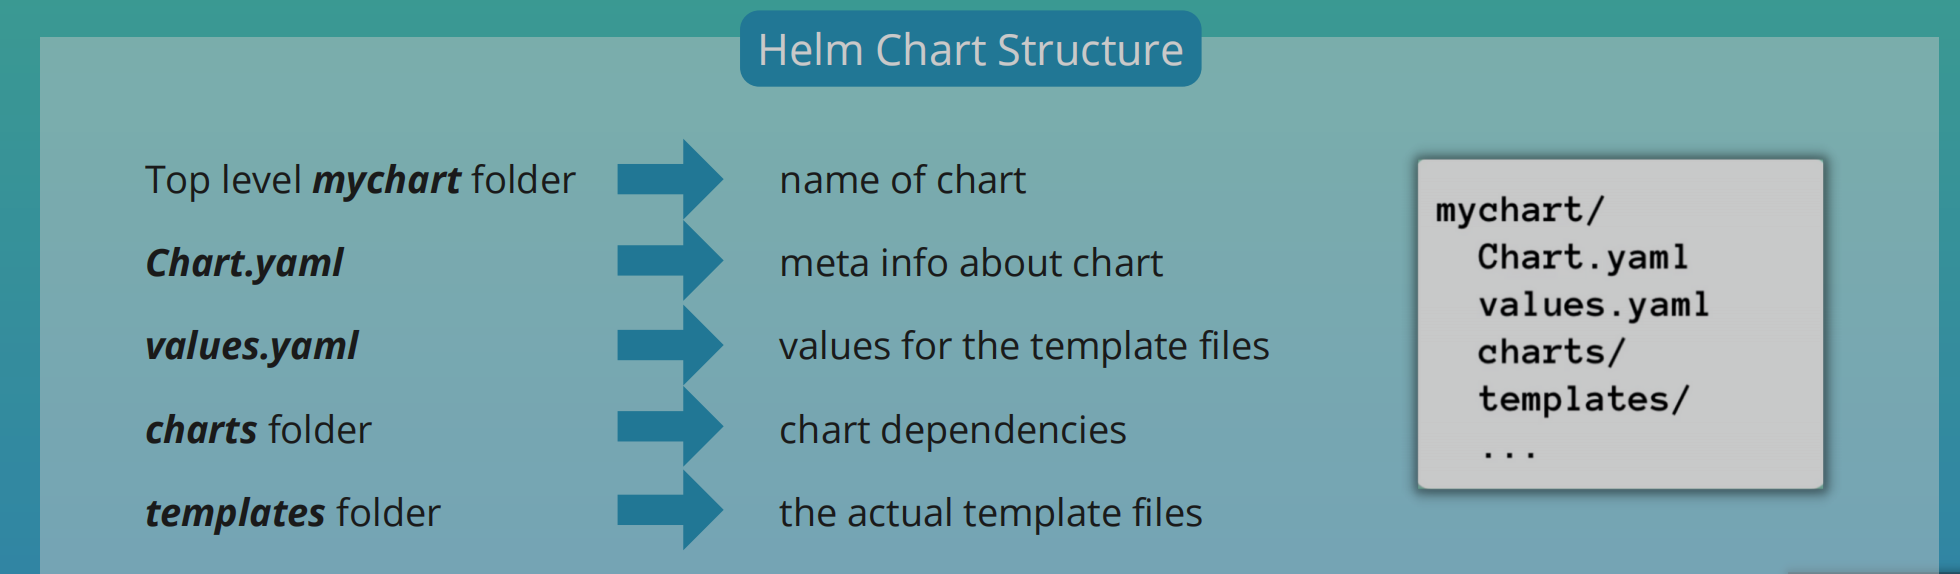
helm install <chartname>
- Template files will be filled with actual data from
values.yaml
Values Injection into template files
- Values can be overridden
helm install --values=my-values.yaml <chartname>
- Can provide another file
- If the second file only has version property, it will override the version property in the default values.yaml file
- Can also define values with
--setflag
helm install --set version=2.0.0
Release management
- Helm v2
- Installation comes in 2 parts
- Client: Helm CLI
- Server: Tiller
- When you run
helm install <chartname>, the helm CLI sends requests to Tiller which will be running in the K8s cluster. - Tiller will create components with these config files
- Whenever you create or change a deployment, Tiller will store a copy of configuration the client sends for future reference thus creating a history of chart executions
helm upgrade <chartname>applies updates to the existing components instead of creating a new one- If upgrade goes wrong, you can rollback using helm rollback
<chartname> - Downsides
- Tiller has too much power instead of K8s cluster
- Security issue
- Tiller was removed in Helm 3
- Installation comes in 2 parts
Helm Demo: Managed K8s cluster
Install a Stateful App on K8s using Helm
- We'll deploy a replicated database and configure its persistence and make it accessible through a UI using Ingress
- We'll use Helm to make the process more efficient
Overview
- Deploy
mongodbusing Helm - Create 3 replicas using StatefulSet
- Configure data persistence with Linode's cloud storage
- Deploy UI client
mongo-express - Configure
nginx-ingress - You will need this setup almost always for your K8s cluster regardless of the Db or Cloud Platform
Create K8s cluster on LKE
- After creating the cluster, download the access credentials so you can use kubectl to connect to cluster
- Set file as environmental variable
export KUBECONFIG=file.yaml
k get nodes
Deploy MongoDB StatefulSet
- 2 ways
- Create all config files yourself
- StatefulSet Config files
- Services
- Other configs
- Use bundle of those config files
- Could be a Helm chart
- Create all config files yourself
- Search for mongodb helm chart
helm repo add bitnami https://charts.bitnami.com/bitnami
helm search repo bitnami
- kubectl and helm commands will be run against that cluster
- There may be values you want to override
- Helm Chart should use the StorageClass of Linode's Cloud Storage
linode-mongodb.yaml
architecture: replicaset
replicaCount: 3
persistence:
  storageClass: "linode-block-storage"
auth:
  rootPassword: abcdefgh
Install chart with override values
helm install mongodb --values linode-mongodb.yaml bitnami/mongodb

helm install [our name] --values [value file name] [chart name]
- One physical storage is created for each of the 3 pods
Deploy MongoExpress
- 1 Pod
- 1 Service
Check YAML file contents
k get secret mongodb -o yaml
linode-mongo-express.yaml
apiVersion: apps/v1
kind: Deployment
metadata:
  name: mongo-express
  labels:
    app: mongo-express
spec:
  replicas: 1
  selector:
    matchLabels:
      app: mongo-express
  template:
    metadata:
      labels:
        app: mongo-express
    spec:
      containers:
        - name: mongo-express
          image: mongo-express
          ports:
            - containerPort: 8081
          env:
            - name: ME_CONFIG_MONGODB_ADMINUSERNAME
              value: root
            - name: ME_CONFIG_MONGODB_SERVER
              value: mongodb-0.mongodb-headless
            - name: ME_CONFIG_MONGODB_ADMINPASSWORD
              valueFrom:
                secretKeyRef:
                  name: mongodb
                  key: mongodb-root-password
---
apiVersion: v1
kind: Service
metadata:
  name: mongo-express-service
spec:
  selector:
    app: mongo-express
  ports:
    - protocol: TCP
      port: 8081
      targetPort: 8081
k apply -f linode-mongo-express.yaml
Ingress
-
Deploy Ingress Controller
-
Create Ingress rule
-
Use Helm Chart for Ingress Controller
helm repo add ingress-nginx https://kubernetes.github.io/ingress-nginx
helm repo update
helm install nginx-ingress ingress-nginx/ingress-nginx --set controller.publishService.enabled=true
- Create a NodeBalancer on Linode
- Becomes the entry point into our cluster
Ingress Rule
apiVersion: networking.k8s.io/v1
kind: Ingress
metadata:
  annotations:
    kubernetes.io/ingress.class: nginx
  name: mongo-express
spec:
  rules:
    - host: 192-46-238-134.ip.linodeusercontent.com
      http:
        paths:
          - path: /
            backend:
              service:
                name: mongo-express-service
                port:
                  number: 8081
            pathType: Prefix
- If you have a domain, you need to configure it to point to the IP address of the Node Balancer
k apply -f linode-ingress.yaml
Steps
- Browser: hostname configured in Ingress rule
- Hostname gets resolved to external IP of NodeBalancer
- Ingress Controller resolved rule and forwarded it to internal service of MongoExpress
Scale down statefulset
k scale --replicas=0 statefulset/mongodb
List Charts
helm ls
Uninstall with helm
helm uninstall mongodb
Deploying images in K8s from Private Docker Repository
- Common workflow for your app
- Commit your code
- Triggers CI build on Jenkins
- Build app and created Docker Image
- Image is pushed to private registry e.g. docker hub, Nexus, AWS ECR, etc
- Pull image into K8s cluster
- For private repos, you need explicit access from the cluster
Steps To Pull Image from Private Registry Into Cluster
- Create Secret Component with access token or credentials to docker registry
- Configure Deployment/Pod
- Use Secret using
imagePullSecrets
Docker Login
- Create config.json file for Secret
- After login, check config.json file
aws ecr get-login
- Minikube can't access credStore directly so you have to docker login manually
cat .docker/config.json
SSH into minikube
minikube ssh
Login directly in minikube
docker login ....
- We'll use the config.json file in minikube to create the Secret
Create Secret Component
- Copy file from minikube to local to get access to credentials
scp -i $(minikube ssh-key) docker@$(minikube ip):.docker/config.json .docker/config.json
- Convert contents to base64
cat .docker/config.json | base64
docker-secret.yaml
apiVersion: v1
kind: Secret
metadata:
  name: my-registry-key
data:
  .dockerconfigjson: base64encodedjsonfile
type: kubernetes.io/dockerconfigjson
Using kubectl directly
# With kubectl
kubectl create secret generic my-registry-key \
--from-file=.dockerconfigjson=.docker/config.json \
--type=kubernetes.io/dockerconfigjson

k get secret -o yaml
- Can create docker login secret directly with credentials
aws ecr get-login-password

kubectl create secret docker-registry my-registry-key \
--docker-server=https://private-repo \
--docker-username=user \
--docker-password=pwd
- With this approach, if you have more than one login credential, you would have to create a secret for each credential and you'd have to do it one by one
Configure Deployment Component
- Secret must be in the same namespace as the deployment
config.json e.g.
{
  "auths": {
            "227984707254.dkr.ecr.us-east-1.amazonaws.com": {
                "auth": "token"
            },
            "46.101.137.161:8083": {},
            "https://index.docker.io/v1/": {},
            "registry.gitlab.com": {}
  }
}
K8s Operator
- Used mainly for Stateful applications
- Scenario
- Have a K8s cluster with Deployment (3 replicas), ConfigMap, Service
- When one replica crashes, K8s recovers it using its built-in
Control Loopmechanism - Backups aren't necessary for Stateless apps
- Control Loop
- K8s knows the actual state of your apps vs the desired state
- Always tries to match the actual state to the desired state
- Scenario
Stateful Apps Without Operator
- Need more hand-holding throughout its life-cycle
- When creating or destroying them
- E.g. if you have 3 mysql replicas
- All 3 replicas are different
- They have their own state and identity
- Order is important
- There must be constant communication between replicas so data stays consistent
- A lot of details need to be considered
- The process will vary for each application
- There's no standard solution
- How its done is
Postgreswill vary from how its done inMySql
- How its done is
- Stateful apps require manual intervention
- You can opt for hosting stateful apps like the database outside K8s. But there are certain stateful apps that must run in K8s like
Prometheusoretcdstore - There is a need for an alternative to managing stateful apps
- The alternative is the
Operator
Stateful Apps with Operator
- Replaces the human operator with a software operator
- Program has knowledge about
- How to deploy app
- How to create cluster of replicas
- How to recover when a replica fails
- Tasks are automated and reusable
- The Operator
- At its core, it has the same
Control Loopmechanism as K8s - It watches for changes and acts accordingly
- Its like a custom control loop in K8s
- Uses CRDs
- Custom Resource Definitions
- Basically a custom K8s component
- Are custom K8s components (extends K8s API)
- Can create your own components aside Pods, Deployments, etc
- Custom Resource Definitions
- Includes domain/app-specific knowledge to automate the entire lifecycle of the app it manages or operates
- At its core, it has the same
Summary
- K8s can manage the complete lifecycle for Stateless app
- K8s can't natively automate the process for deploying stateful apps
- Uses extensions, which are Operators
- Uses its own operator for different applications
- e.g.
prometheus-operator,mysql-operator,postgres-operator
- e.g.
Who creates Operators?
- Built by experts in the business logic of installing, running and updating that specific application.
- https://operatorhub.io/
- There is an Operator SDK that you can use to create your own Operator
Helm and operator demo
Setup Prometheus Monitoring in K8s
Prometheus Architecture
- Prometheus Server processes and stores metrics data
- Alertmanager: Sends alerts based on processed data
- Can visualized scraped data in UI
Prometheus Web UI- Can also use
Grafanafor data visualization from Prometheus data
How to deploy the different parts in K8s Cluster
- Create all configuration YAML files yourself and execute them in the right order because of the dependencies
- Inefficient
- A lot of effort
- Using an operator
- Manager of all Prometheus components
- Manage pods and its replicas
- Manages the combination of all components as one unit
- Find prometheus operator
- Deploy in K8s cluster
- Manager of all Prometheus components
- Using Helm chart to deploy operator
- Maintained by community
- Helm: Initiate setup
- Operator: Manage setup
Setup With Helm Chart
helm repo add prometheus-community https://prometheus-community.github.io/helm-charts
helm install prometheus-community prometheus-community/kube-prometheus-stack
Understand The Created Prometheus Components
- StatefulSets
- Prometheus Server
- Alertmanager
- 3 deployments
- Prometheus Operator
- Created Prometheus and alertmanager StatefulSet
- Grafana
- Kube State Metrics
- Own Helm Chart
- Dependency of this Helm chart
- Scrapes K8s components
- Get K8s infrastructure monitoring out of the box
- Prometheus Operator
- 3 replicasets
- Created by deployment
- 1 DaemonSet
- Node Exporter DaemonSet
- Connects to Server
- Translates Worker Node metrics to Prometheus Metrics
- DaemonSet is a component that runs on every single worker node of K8s
- Node Exporter DaemonSet
- Pods
- From deployments and statefulsets
- Services
- Each components has its own
What we get
- Monitoring Stack
- Config for K8s cluster
- Worker Nodes monitored
- K8s components monitored
- Configs are found in configmaps
- You also have secrets
k get crds
Checking what's inside setup
k get statefulset
k describe statefulset <name> > file.yaml
Access Grafana
- In production, configure ingress and point ingress rules to Grafana
- But we'll use port forwarding, so we'll use port forwarding
k get pod
k logs prometheus-community-grafana-6fccc7bf69-ldksm -c grafana
k port-forward deployment/prometheus-community-grafana 3000
- Username: admin
- Password: prom-operator
Prometheus UI
k get pods
k port-forward prometheus-prometheus-community-kube-prometheus-0 9090
Secure your cluster: Authorization with RBAC
- RBAC: Role Based Access Control
- Why Authorization
- Need to manage permissions in cluster
- Admins require admin Access
- Devs require limited access
- Best Practice: Least Privilege Rule
- Give every user only the permissions they need. Not more
Role & Role Binding
- If each dev team deploys app into a different namespace
- How do you restrict access of team members to only their namespace and the resources in their namespace
- For this, we have RBAC
- With RBAC, you can define access to each namespace using Roles
- With
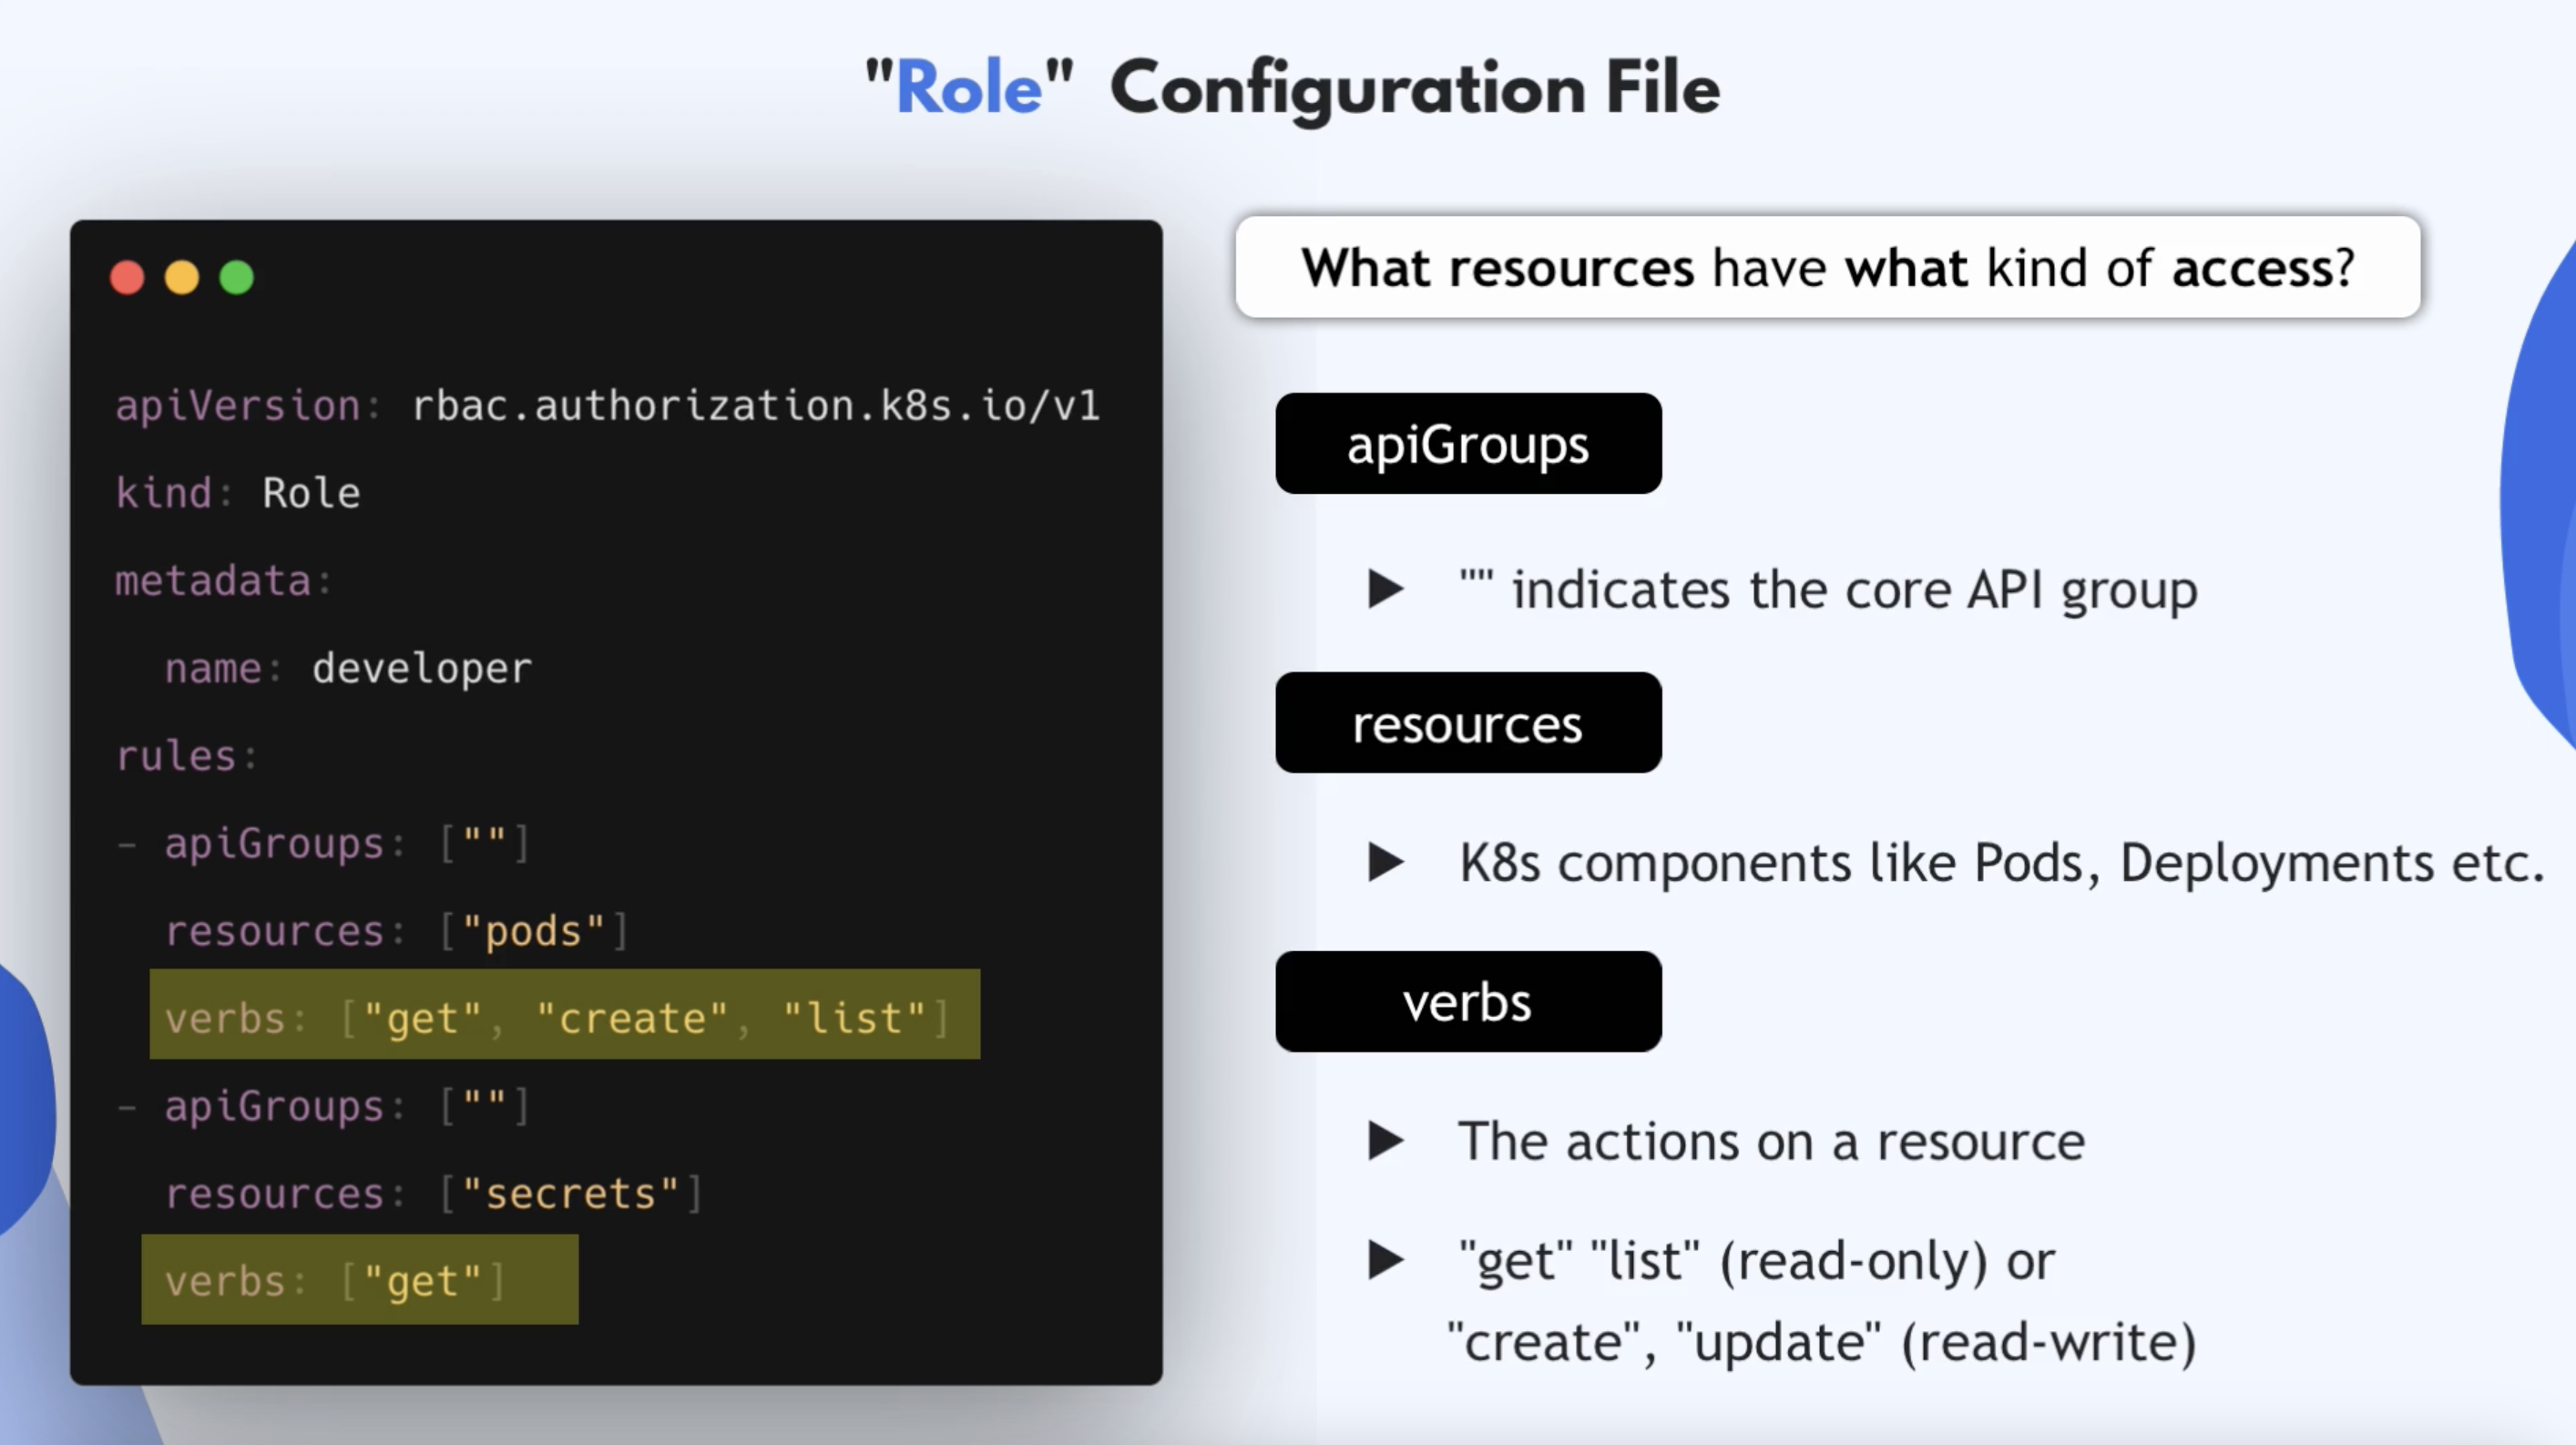
Rolecomponent, you can define namespaced permissions Roleis bound to a specific namespace- Defines what resources in the namespace you can access and what you can do with these resources
- For each dev team, you can create a
Rolefor their namespace that they're managing and define what they can do in that namespace
Roleonly defines the Resources and Access Permissions to those Resources- There's no information on who gets these permissions
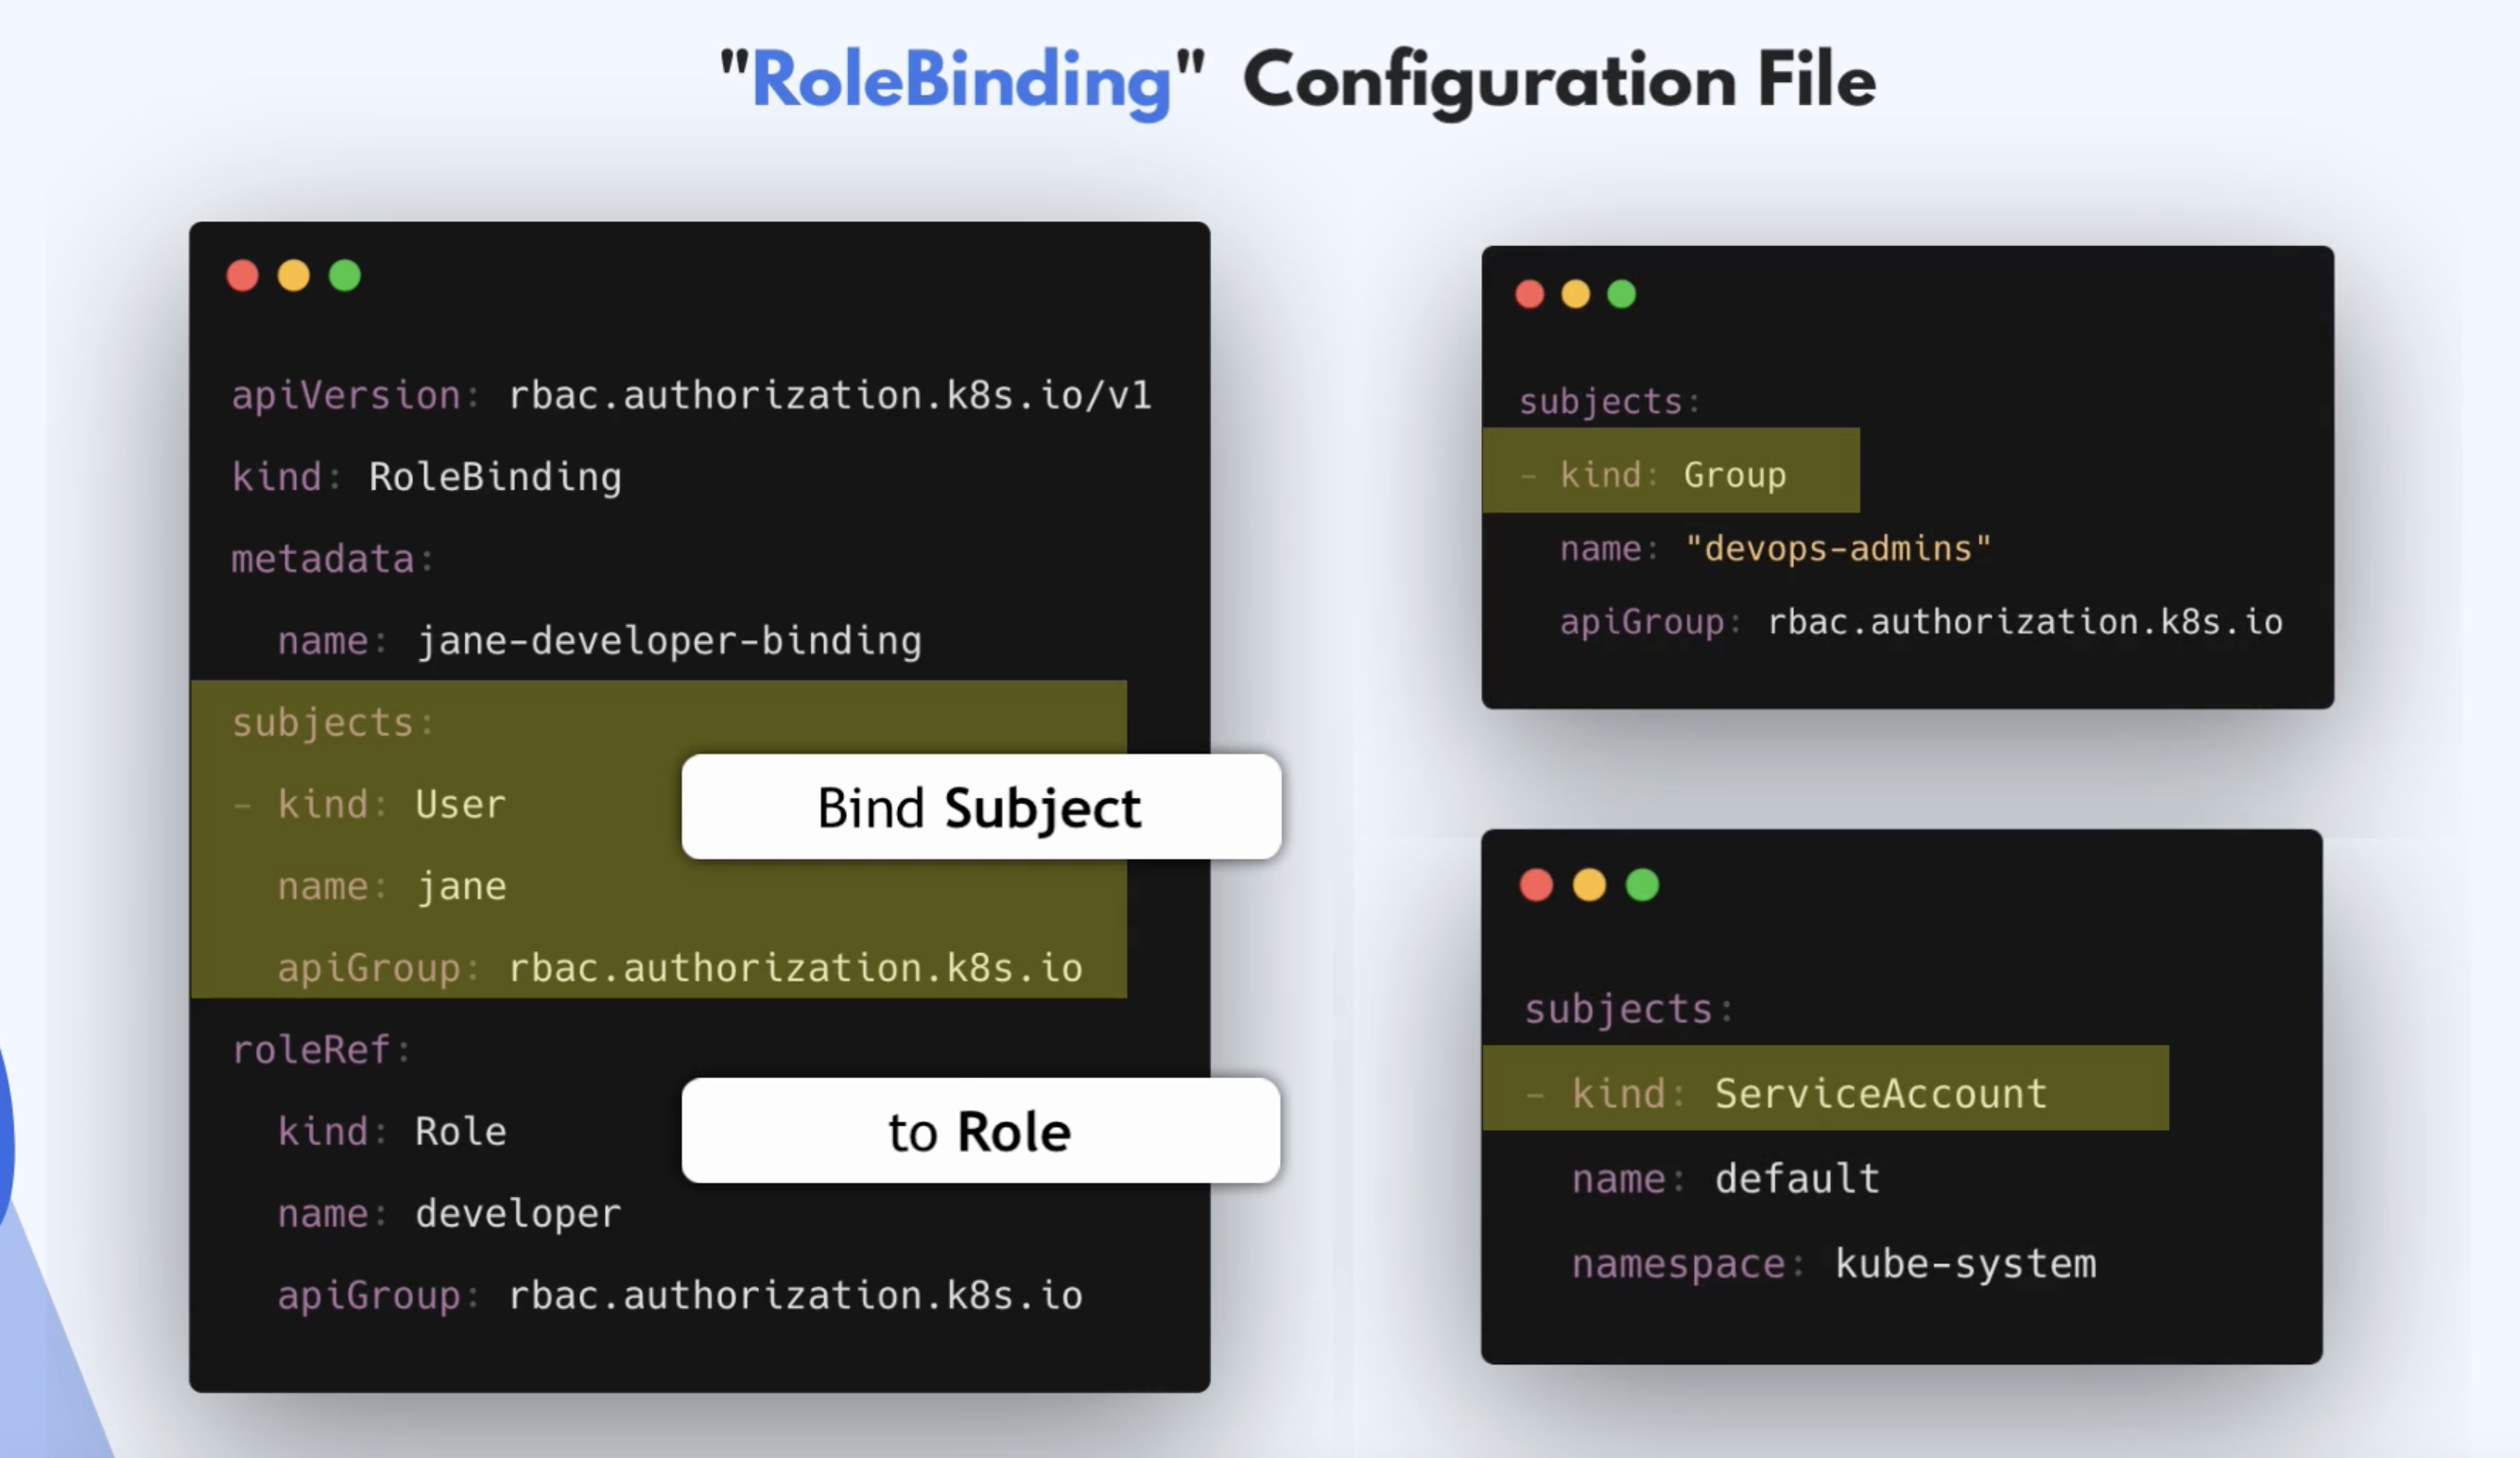
- How do you attach
RoleDefinition to a developer or a team?- For that, we have another component called
RoleBinding
- For that, we have another component called
- RoleBinding
- Link a role to a user or user group
- All the members in the group get permissions defined in the
Role
ClusterRole & ClusterRole Binding
- What about Admins?
- They manage namespaces in clusters
- Configuring cluster-wide Volumes
- Basically, they do cluster-wide operations
- How do we defined permissions for them?
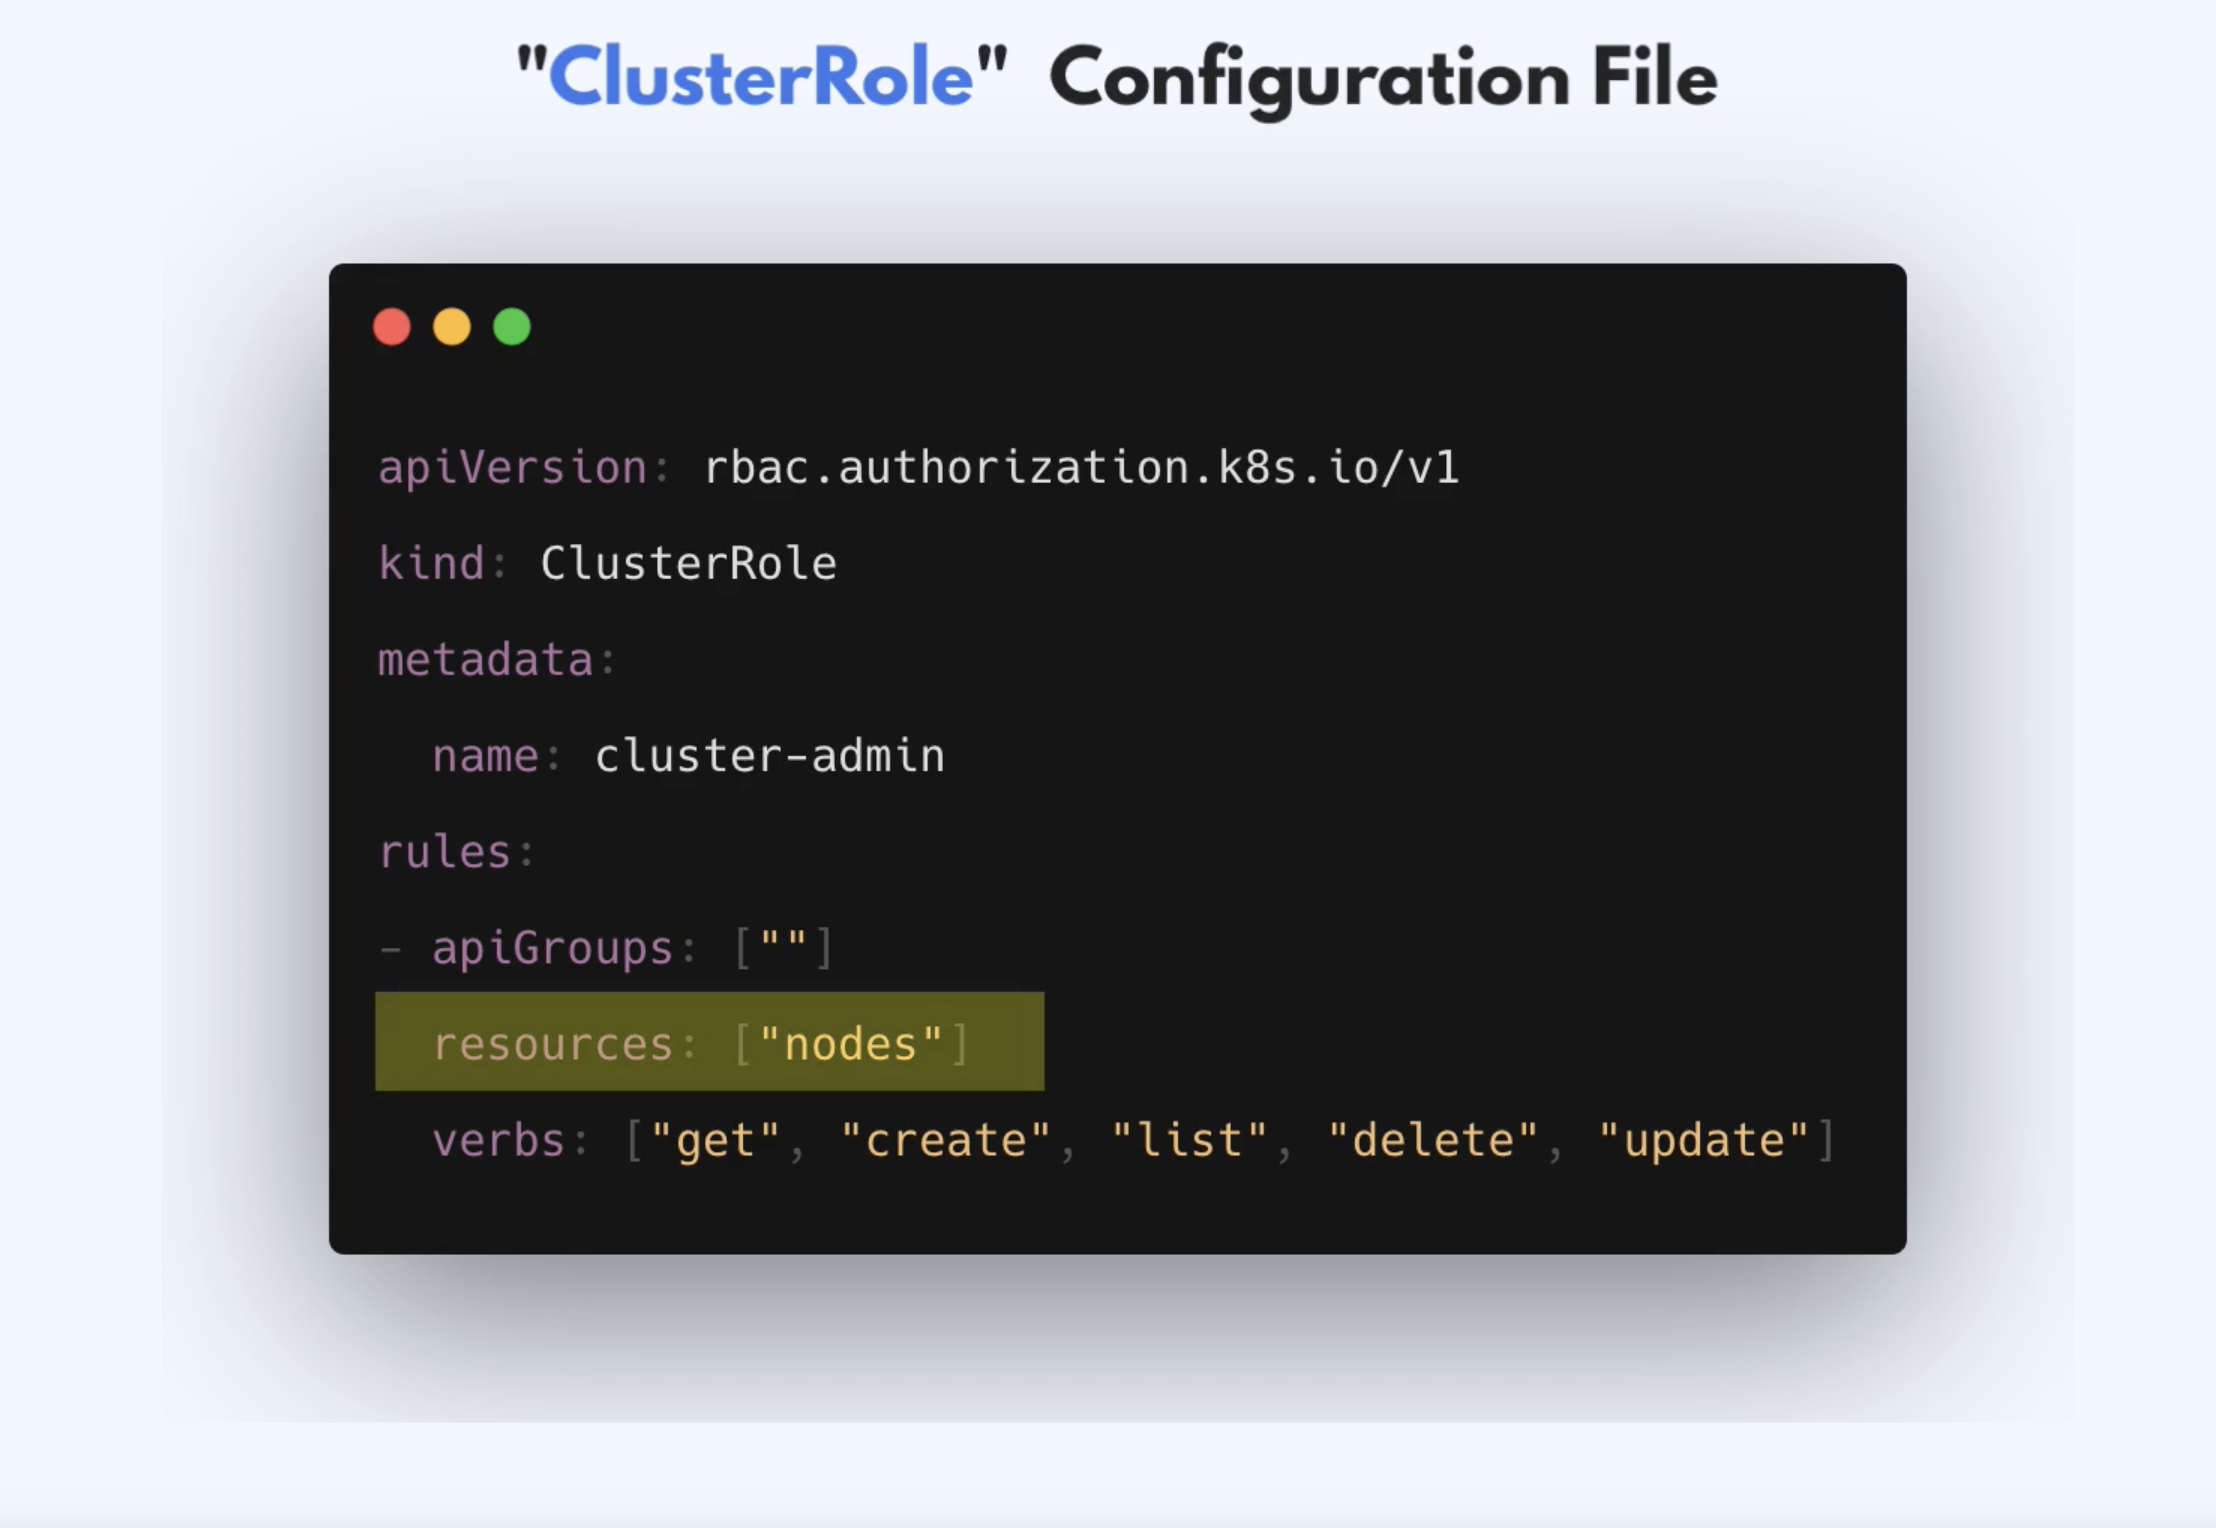
Roledoesn’t work here because Role is limited to a namespace but admins require cluster-wide access
- We use ClusterRole
- Defines resources and permissions cluster-wide
- Create a
ClusterRoleand an admin-group and attach theClusterRoleto the admin-group using theClusterRole Binding
Users and Groups in K8s
- K8s doesn't manage Users natively
- K8s gives us the interface and flexibility to implement authentication in many different ways
- Admins can choose from different authentication strategies
- No K8s Objects exist for representing normal user accounts
External Sources for Authentication
- Can be Static Token File
- With user details: token, user, uid
- Certificates that are signed by K8s
- 3rd party identity service like LDAP
- A K8s admin will configure external source of auth
- API server handles authentication of all requests
- API Server uses one of these configured authentication methods
- When you have a token file, you can pass the file to API server so that API server knows how to lookup information to authenticate users when they try to connect to the cluster
kube-apiserver --token-auth-file=/users.csv [other options]
- To define groups that users belong to, add a group column
- For certificate, the admin will have to manually create certificates for users
- Or configure LDAP as an authentication source for the server
Service Accounts
- Admins: Access to whole cluster through ClusterRole
- Developer: Namespaced Access through Role
- This takes care of human permissions
- What about application permissions?
- Apps and services also access the Cluster
- They can be inside or outside the cluster
- Inside: Prometheus or Microservices needing access only within their namespace
- External: CI/CD tool like Jenkins or Infrastructure Provisioning tools like Terraform to configure the cluster
- We have a K8s resource or components that represents an Application User
- This is called a
ServiceAccount - User is not a K8s components
k create serviceaccount sa1
- You can link ServiceAccount to
RolewithRoleBinding - Can also link the
ServiceAccounttoClusterRolewithClusterRoleBinding
Examples of Config
Role Config File
- Can add namespace to metadata to scope it
More granular access
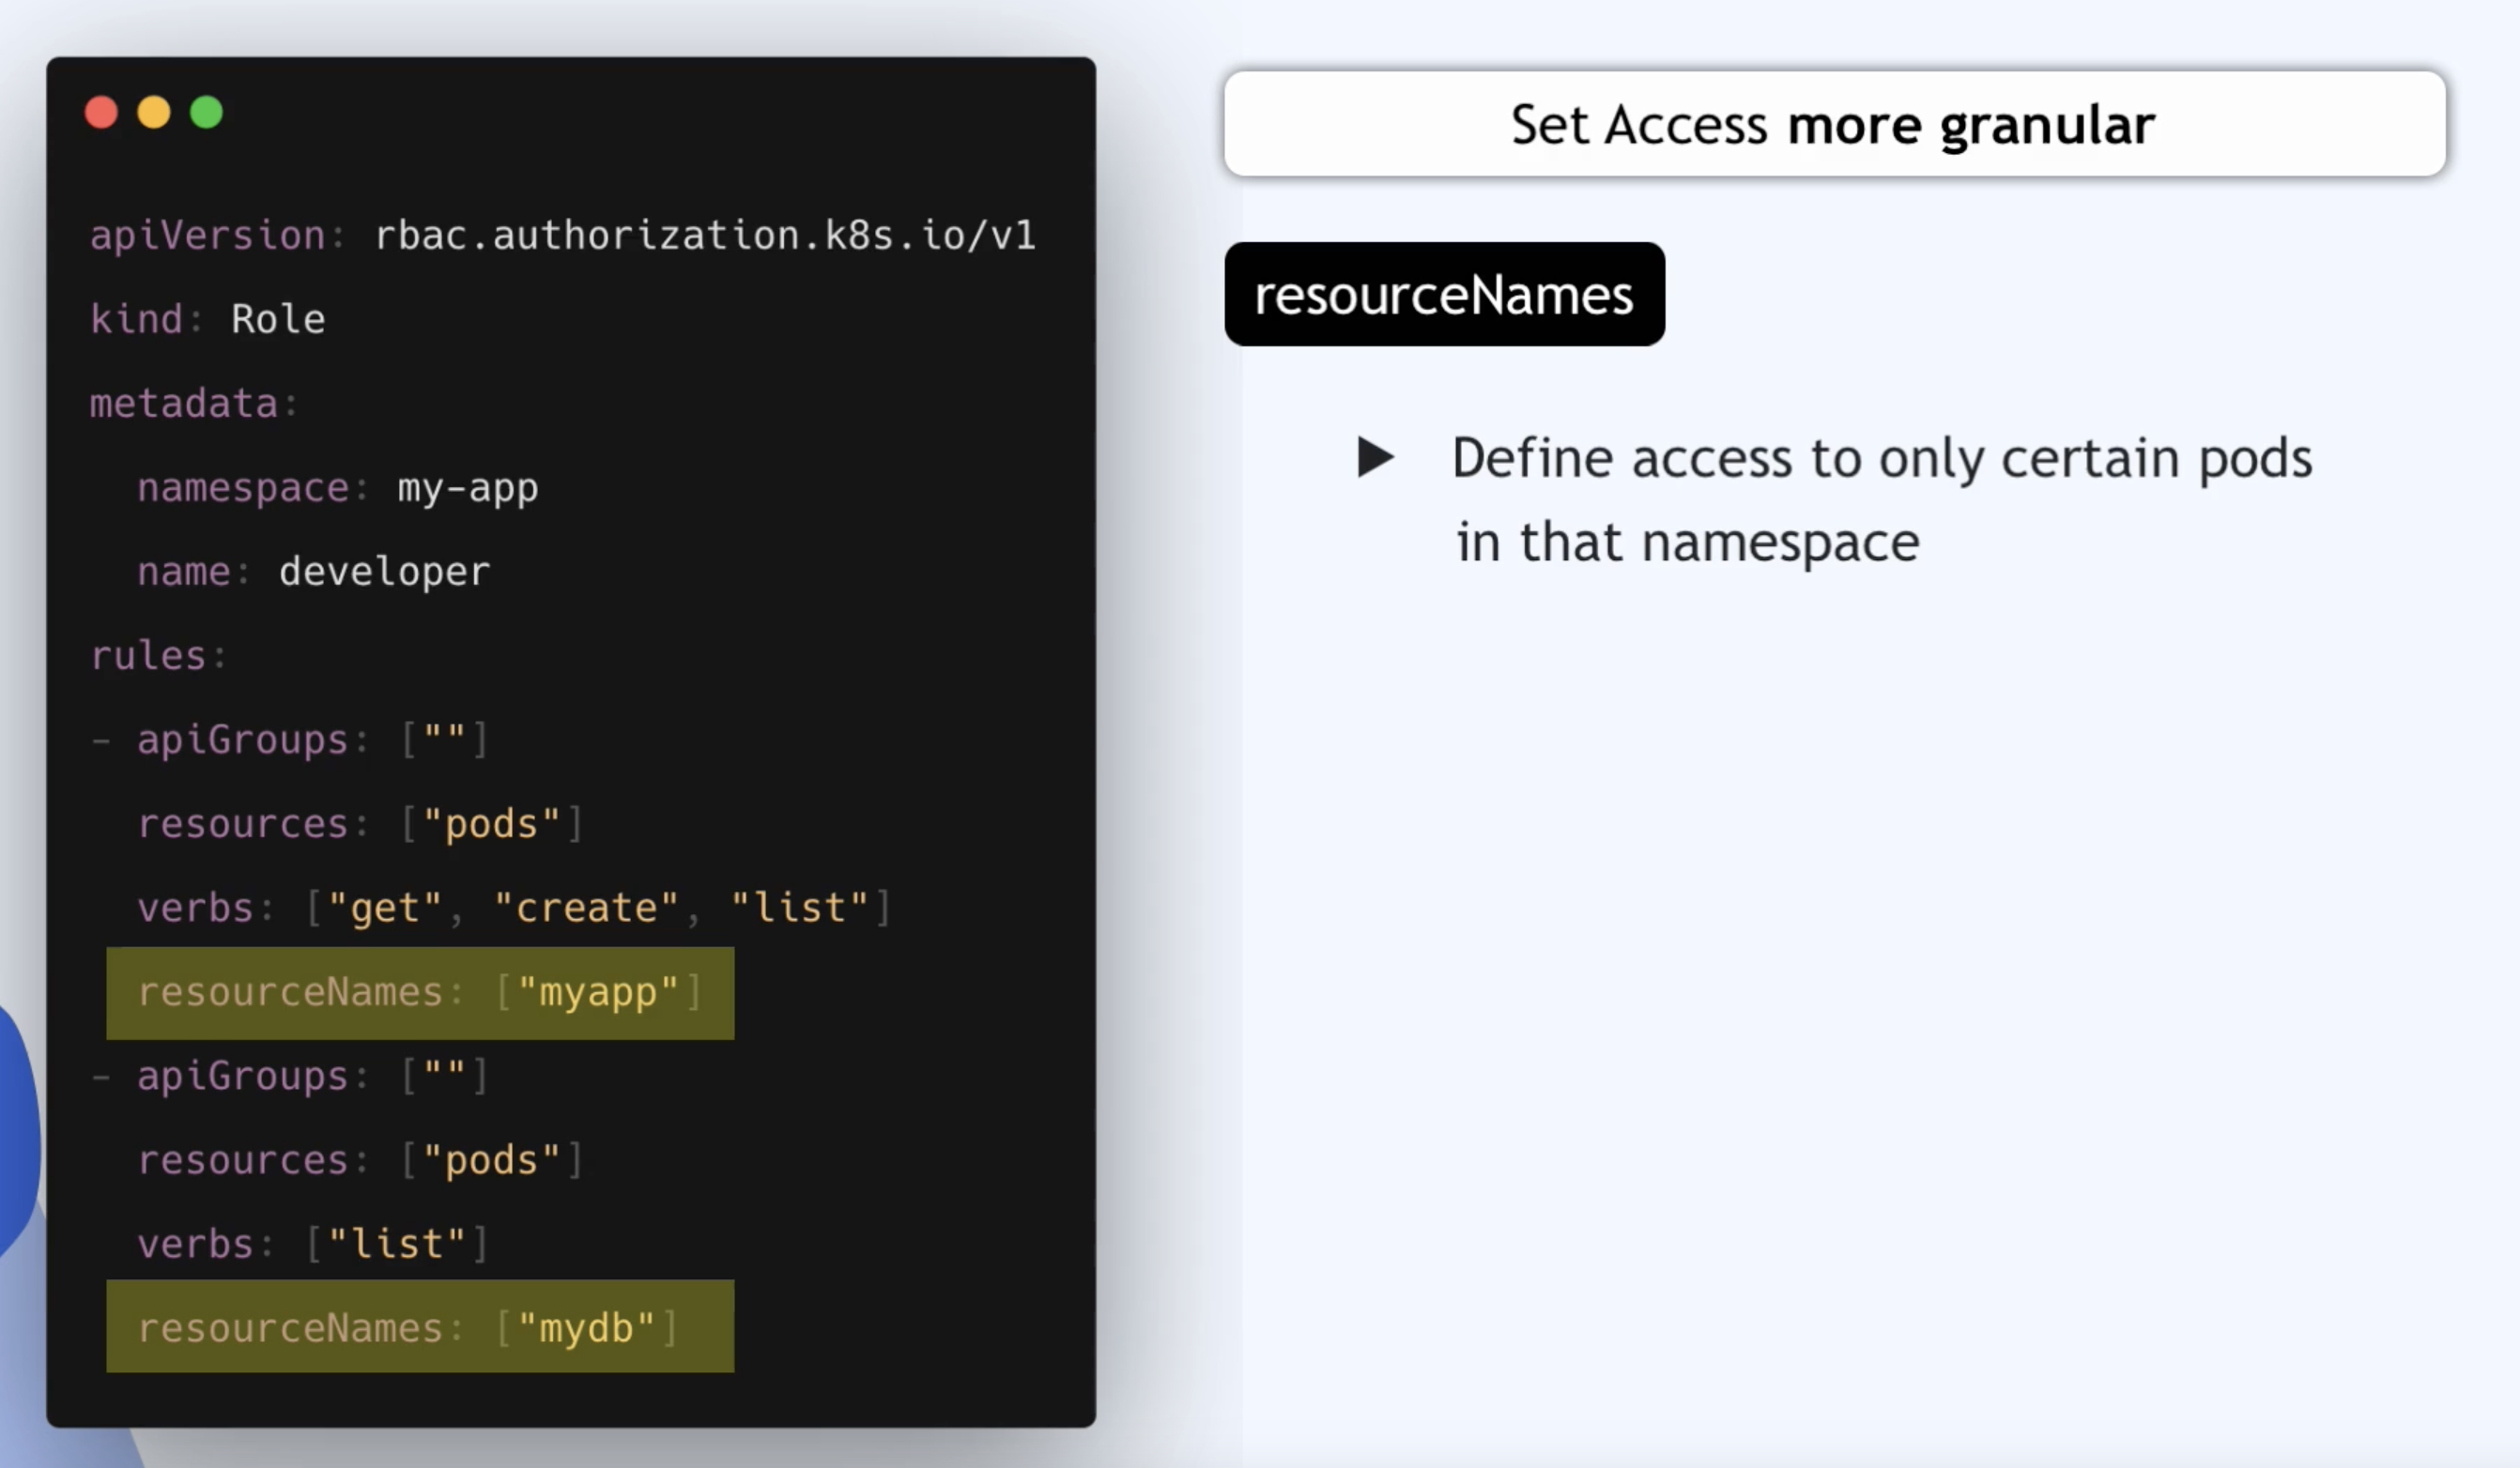
- Resource could also be a namespaces since namespace is a cluster-wide resource
- ClusterRole Config File
- Define access for cluster-wide resources
- Define access for namespaced resources
- Will give you access to all pods, services and deployments across all namespaces

Creating & Viewing RBAC Resources
- Create Role, ClusterRole, etc just like any other K8s component
k apply -f developer-role.yaml
- View components with get and describe command
k get roles
k describe role developer
Checking API Access
- Kubectl provides auth
can-icommands - To quickly check if current user can perform a given action
k auth can-i create deployments --namespace dev
- Admins can also check permissions of other users
- Layers of Security
- K8s first checks if user is Authenticated
- Then it checks if user is authorized to perform that action or verb
- Uses RBAC
- Is one of multiple Authorization Modes
- With RBAC: Role, ClusterRole and Bindings are checked
More reading
- Site dedicated to good practices and tooling around Kubernetes RBAC
- Authenticating
- 3 Realistic Approaches to K8s RBAC
Microservices in K8s
- K8s emerged as a platform for Microservices applications
- Can be developed, deployed and managed independently of each other
- Each business functionality is encapsulated into its own Microservice
- Smaller independent apps
- Each MS can be developed, packaged and released independently
- How MS communicate
- Service-to-service API calls
- Message Broker application
- All MS talk to the Message Broker
- It manages communication between the MS
- e.g. Redis, RabbitMQ
- Service Mesh Architecture
- Instead of the central message broker each MS has its own helper program that handles the communication for that service
- Helper application is a SideCar Container in K8s
- Delivers request to the SideCar of another microservice
Istiois one of the most popular service meshes- Learn more about Istio Service Mesh here
What you need to know as a DevOps Engineer
- Task will be to deploy existing Microservices Application in the K8s Cluster
- What information do you need from Developers?
- Which microservices to deploy
- Which microservice is talking to which microservice
- How are they communicating?
- Direct API calls
- Message Broker
- Service Mesh
- Which app are they using?
- Which database are they using? 3rd Party Services
- On which port does each Microservice run
- What information do you need from Developers?
- Then Prepare K8s environment
- Deploy any 3rd party apps
- Create
SecretsandConfigMapsfor Microservices - Create
DeploymentandServicefor each Microservice- Decide whether they'll run in the same namespace or if each service will run in its own namespace
Demo Project: Deploy Microservices Application inK8s Cluster
- All microservices are in the same repo
- Info we need to know
- Don't need to understand code or what the apps are doing?
- What MS are we deploying?
- How are they connected?
- Image Names for each Microservice
- What environmental variables each Microservice expects
- Any 3rd party services or databases?
- Which service is accessible from the outside?
- On which port each MS starts
- Teams developing MS
- For our app, since its one team, we can deploy it into the same namespace
App Connections
- Repo
- About the app
- Sample cloud-native application with 10 microservices showcasing Kubernetes, Istio, gRPC and OpenCensus.
- Redis
- Message Broker
- In-memory database
- Store cart data
- Load Generator is optional

- Create Deployment and Service Configurations
Minimum deployment and service config
---
apiVersion: apps/v1
kind: Deployment
metadata:
  name: xxx
spec:
  selector:
    matchLabels:
      app: xxx
  template:
    metadata:
      labels:
        app: xxx
    spec:
      containers:
        - name: xxx
          image: xxx
          ports:
            - containerPort: xxx

---
apiVersion: v1
kind: Service
metadata:
  name: xxx
spec:
  type: ClusterIP
  selector:
    app: xxx
  ports:
    - protocol: TCP
      port: xxx
      targetPort: xxx
- We'd need to provide a volume for our Redis application because Redis persists in data in-memory
- Different Volume Type available
- Persistent Volume Types
- Exist beyond lifetime of a Pod
- Ephemeral Volume Types
- K8s destroys volume when pod ceases to exist
- This type is called
emptyDir- Is initially empty
- First created when a Pod is assigned to a Node
- Exists as long as the Pod is running
- Container crashing does not remove Pod from a Node
- Therefore, data is safe across container crashes
- Persistent Volume Types
redis-cart-depl.yaml
apiVersion: apps/v1
kind: Deployment
metadata:
  name: redis-cart
spec:
  selector:
    matchLabels:
      app: redis-cart
  template:
    metadata:
      labels:
        app: redis-cart
    spec:
      containers:
        - name: redis
          image: redis:alpine
          ports:
            - containerPort: 6379
          volumeMounts:
            - mountPath: /data
              name: redis-data
      volumes:
        - name: redis-data
          emptyDir: {}
Deploy Microservices Into K8s
- Create K8s cluster in Linode
- Download config file and set permissions
chmod 400 ~/Downloads/config.yaml
Create namespace
k create ns microservices
Deploy to namespace
k apply -f config.yaml -n microservices
Production and security best practices
- Created the first config with bad practices
Best Practice 1: Pinned (Tag) Version for each Container Image
  template:
    metadata:
      labels:
        app: emailservice
    spec:
      containers:
        - name: server
          image: gcr.io/google-samples/microservices-demo/emailservice:v0.2.3
          ports:
            - containerPort: 8080
- Always using the latest version makes the app unpredictable
- Might break something
- Not transparent which versions are currently deployed
- Can ask dev which versions need to be developed
Best Practice 2: Liveness Probe for Each Container
- K8s manages resources intelligently
- Restarts Pod when it dies
- What happens when Pod runs but application inside is not in a healthy state
- We need to let K8s know which state our application is
- So K8s automatically restarts the application
- Can perform Health Checks with Liveness Probe
- Checks if app is healthy
- We could add the script or configuration ourselves to check if app is healthy
- Assuming the developers added a small script or app in every image to check the app health
containers:
- name: server
  image: gcr.io/google-samples/microservices-demo/adservice:v0.3.4
  ports:
    - containerPort: 9555
  env:
    - name: PORT
      value: "9555"
  resources:
    requests:
      cpu: 200m
      memory: 180Mi
    limits:
      cpu: 300m
      memory: 300Mi
  livenessProbe:
    initialDelaySeconds: 20
    periodSeconds: 15
    exec:
      command: ["/bin/grpc_health_probe", "-addr=:9555"]
- Is a container attribute
Best Practice 3: Readiness Probe for Each Container
- K8s knows Pod state but not application state
- Liveness Probe
- For application state
- Health checks only after container has started
- What about the starting up process?
- How does K8s know that the application is fully initiated, started and ready to receive requests
- Readiness Probe
- Let's K8s know if the application is ready to receive traffic
- This is important because if the app requires 2 minutes to start, all requests to the app within those 2 minutes will fail
- Without it, K8s assumes the app is ready to receive traffic as soon as the container starts
- Checks availability during start up
  containers:
    - name: server
      image: gcr.io/google-samples/microservices-demo/adservice:v0.3.4
      ports:
        - containerPort: 9555
      env:
        - name: PORT
          value: "9555"
      resources:
        requests:
          cpu: 200m
          memory: 180Mi
        limits:
          cpu: 300m
          memory: 300Mi
      readinessProbe:
        initialDelaySeconds: 20
        periodSeconds: 15
        exec:
          command: ["/bin/grpc_health_probe", "-addr=:9555"]
      livenessProbe:
        initialDelaySeconds: 20
        periodSeconds: 15
        exec:
          command: ["/bin/grpc_health_probe", "-addr=:9555"]
Other options to check application health state
- TCP probes
- Kubelet makes probe connection at the node, not in the pod
  containers:
    - name: redis
      image: redis:alpine
      ports:
        - containerPort: 6379
      readinessProbe:
        periodSeconds: 5
        tcpSocket:
          port: 6379
      livenessProbe:
        periodSeconds: 5
        tcpSocket:
          port: 6379
- Used in place of exec
- Kubelet tries to open a socket to the container of n the specified port
- If it succeeds, the container is considered healthy
- Can add initialDelaySeconds if we know the application takes long to load
- Tell kubelet to wait for some seconds before checking for readiness
HTTP Probes
- Kubelet sends an HTTP request to specified path and port
- If application has an endpoint that exposes the health status of the app, we can hit that endpoint to check if app is healthy or not
  containers:
    - name: server
      image: gcr.io/google-samples/microservices-demo/frontend:v0.2.3
      ports:
        - containerPort: 8080
      readinessProbe:
        initialDelaySeconds: 10
        httpGet:
          path: "/_healthz"
          port: 8080
          httpHeaders:
            - name: "Cookie"
              value: "shop_session-id=x-readiness-probe"
      livenessProbe:
        initialDelaySeconds: 10
        httpGet:
          path: "/_healthz"
          port: 8080
          httpHeaders:
            - name: "Cookie"
              value: "shop_session-id=x-liveness-probe"
Best Practice 4: Resource Requests for Each Container
- Resource requests
- Some apps may need more CPU or memory resources than other
- You can define resource requests to make sure each app has enough resources to run
- 2 Types of Resources
- CPU
- Memory
- The request is what the container is guaranteed to get
- K8s Scheduler uses this to figure out where to run the Pods
      containers:
        - name: server
          image: gcr.io/google-samples/microservices-demo/adservice:v0.3.4
          ports:
            - containerPort: 9555
          env:
            - name: PORT
              value: "9555"
          resources:
            requests:
              cpu: 200m
              memory: 180Mi
- Best practice: Keep CPU request at 1 or below
- CPU resources are defined in millicores
- 100m - 100 millicores
- Memory resources are defined in bytes
- 64Mi - Mebibyte
- 1 mebibyte = 1.048576 megabytes
Best Practice 5: Resource Limits for each container
- What if container needs more resources?
- One container can end up consuming more than the requested resources
- If not limited, container could consume all the Node's resources
      containers:
        - name: server
          image: gcr.io/google-samples/microservices-demo/adservice:v0.3.4
          ports:
            - containerPort: 9555
          env:
            - name: PORT
              value: "9555"
          resources:
            requests:
              cpu: 200m
              memory: 180Mi
            limits:
              cpu: 300m
              memory: 300Mi
- If you put values larger than your biggest node, your Pod will never be scheduled
- Some apps may require more resources than others
- Redis
- More memory
- Less CPU
Best Practice 6: DON'T EXPOSE A NODEPORT
- NodePort usage is easy but it exposes the cluster to security risks
- It opens a port on each Worker Node which can be accessed by external sources
- So you have multiple entry points in the cluster and you increase the attack surface
- Only use Internal Services (ClusterIP) and have only one entry point into the cluster
- The entry point should be outside the cluster, on a separate server
- We can use the LoadBalancer which uses the Cloud platform's load balancer to create an external single entry point into the cluster
- We can also use the Ingress Controller
Best Practice 7: More than 1 Replica For Deployment
- Configure more than 1 replica for deployment
- If 1 Pod crashes, your application is not accessible until new Pod restarts
- With more replicas, the application is always available. No downtime for users
- At least 2 replicas for every application
Best Practice 8: More than 1 Worker Node In your Cluster
- Always use more than one Worker Node
- You'd have one single point of failure with just one Node
- Each replica should run on a different Node
- Reasons for server availability
- Server crashes
- Server reboots because of some update
- Server maintenance
- Server broken
Best Practice 9: Using Labels
- Use Labels for all resources
- Labels are Key Value Pairs
- They attach to K8s resources
- They are custom identifiers for components
- Should be meaningful and relevant to users
- With these labels they can be referenced
- Can add Technical Labels, Business Labels, etc
Technical
labels:
    application: my-app
    stage: production
Business
labels:
    owner: payment-team
    project: fraud-detection
- We were grouping Pods with labels and referencing them in services
Best Practice 10: Using Namespaces
- Use namespaces to isolate resources from each other
- Organize K8s resources in Namespaces
- Also useful for defining access rights based on namespaces
- Namespace Scoped Components
- Roles
- RoleBindings
- Namespacing depends on teams
- Can have 1 namespace for whole Microservice
- Can have 1 namespace per microservice
3 Best Security Practices
- Ensure images are free of vulnerabilities
- 3rd party libraries may have vulnerabilities eg. base images
- Can do vulnerability or security scans manually or in a pipeline (automated scans)
- No Root Access for containers
- Container with root access have access to host-level resources
- If container is hacked, more damage can be done
- Most official images do not use root user
- For other 3rd party services, check whether container is running as root
- Update K8s to the latest version
- Important security fixes
- General bug fixes
- Need to do it node by node to avoid application downtime
Demo Project: Create Helm Chart For Microservices
- We have 10 similar Deployment and Service configurations
- We could have
- 1 blueprint for Deployments and Services for all microservices
- Set values for individual microservices
- We can do that with
Helm charts- Can define reusable K8s config
- Creating Helm Charts: 2 ways
- 1 Helm Chart for each microservice
- When configurations are very different
- 1 Shared Helm Chart for all microservices
- 1 Helm Chart for each microservice
- Can use a combination of both
- Shared chart for similar applications
- Separate charts for completely different apps
- We will create 1 shared Helm Chart
Basic Structure of Helm Chart
helm create microservice
- Files and dirs
- Chart.yaml
- Meta data about chart
- charts folder
- Contains chart dependencies
- .helmignore
- Files you don't want to include in your helm chart when building a package of the chart
- Helm charts can be built, packaged and distributed like other artifacts
- Can host archives on helm repo
- templates folder
- Where the actual K8s YAML files (template files) are created
- The structure of the files are the same as actual K8s YAML files
- Instead of hardcoded values, we have placeholders defined in
- Replaces placeholders with values later
- The files are just templates. Not actual configs
- values.yaml
- Actual values for the templates file
- Chart.yaml
Create Microservices Helm Chart
- Basic Template File
deployment.yaml
apiVersion: apps/v1
kind: Deployment
metadata:
  name: {{ .Values.appName }}
spec:
  replicas: {{ .Values.appRelicas }}
  selector:
    matchLabels:
      app: {{ .Values.appName }}
  template:
    metadata:
      labels:
        app: {{ .Values.appName }}
    spec:
      containers:
        - name: {{ .Values.appName }}
          image: "{{ .Values.appImage }}:{{ .Values.appVersion }}"
          ports:
            - containerPort: {{ .Values.containerPort }}
          env:
            {{- range .Values.containerEnvVars}}
            - name: {{ .name }}
              value: {{ .value | quote }}
            {{- end}}
- Envs are always interpreted as strings so they have to be quoted
- value:
{{ .value | quote }}
- value:
service.yaml
apiVersion: v1
kind: Service
metadata:
  name: {{ .Values.appName }}
spec:
  type: {{ .Values.serviceType }}
  selector:
    app: {{ .Values.appName }}
  ports:
    - protocol: TCP
      port: {{ .Values.servicePort }}
      targetPort: {{ .Values.containerPort }}
- Values Object
- A built-in object
- By default, Values is empty
- Values are passed into template from 3 sources
- The values.yaml file in the chart
- User-supplied file passed with
-fflag - Parameter passed with
--setflag
- Several objects are passed into a template from the
- Release
- Files
- Values
- Variable Naming conventions
- Names should begin with a lowercase letter
- Separated with camelcase
Defining Variable Names
- Values may be flat or nested deeply
- Best practice is to use the flat structure
appName: myapp
appRelicas: 1


app:
    name: myapp
    replicas: 3
Dynamic Environment Variables
    spec:
      containers:
        - name: {{ .Values.appName }}
          image: "{{ .Values.appImage }}:{{ .Values.appVersion }}"
          ports:
            - containerPort: {{ .Values.containerPort }}
          env:
            {{- range .Values.containerEnvVars}}
            - name: {{ .name }}
              value: {{ .value | quote }}
            {{- end}}
Set Values
- Could be generic
- Can create custom values file
- Usually outside the directory for the chart
e.g. of values.yaml
appName: servicename
appImage: gcr.io/google-samples/microservices-demo/servicename
appVersion: v.0.0.0
appReplicas: 1
containerPort: 8080
containerEnvVars:
- name: ENV_VAR_ONE
  value: "valueone"
- name: ENV_VAR_TWO
  value: "valuetwo"

servicePort: 8080
serviceType: ClusterIP
email-service-values.yaml
appName: emailservice
appImage: gcr.io/google-samples/microservices-demo/emailservice
appVersion: v0.2.3
appReplicas: 2
containerPort: 8080
containerEnvVars:
  - name: PORT
    value: "8080"
  - name: DISABLE_TRACING
    value: "1"
  - name: DISABLE_PROFILER
    value: "1"

servicePort: 5000
- Values provided in the
email-service-values.yamlwill override that in thevalues.yamlfile - If value is not provided, it'll use the value from the
values.yamlfile
Verify if yaml files are valid
helm template -f email-service-value.yaml charts/microservice
- Helm Rendering Process
- When helm evaluates a chart, it sends all the files that are defined in the template's directory through the
Helm Template Engine - The Engine replaces the variables with the actual values (from 3 different sources)
- It collects the results and sends them to K8s when we execute helm install
- When helm evaluates a chart, it sends all the files that are defined in the template's directory through the
helm lint -f email-service-value.yaml charts/microservice
Deploy the Email Microservice
helm install -f email-service-values.yaml emailservice microservice
helm ls
emailservice: Release namemicroservice: Chart name- Now create values file for all microservices
Create Redis Helm Chart
- It's a 3rd party app, so its lifecycle differs from that of our app's
- We need to create a different Helm chart for it
Check generated manifest without installing the chart
helm install --dry-run
--dry-runsends files to K8s cluster while template only validates it locally
Install into namespace
helm install -f values/email-service-values.yaml emailservice charts/microservice --namespace=microservices
- If you want to specify the namespace as part of the helm install command using a YAML file, you can include the namespace in the namespace field of the file. Here's an example:
# values.yaml
namespace: my-namespace
Uninstall
helm uninstall emailservice --namespace=microservices
Demo Project: Deploy microservices with Helm file
Deploy microservices with helm install
- We can run helm install for each service one by one or we can write a script file with the helm install commands
install.sh
helm install -f values/redis-values.yaml rediscart charts/redis

helm install -f values/email-service-values.yaml emailservice charts/microservice
helm install -f values/cart-service-values.yaml cartservice charts/microservice
helm install -f values/currency-service-values.yaml currencyservice charts/microservice
helm install -f values/payment-service-values.yaml paymentservice charts/microservice
helm install -f values/recommendation-service-values.yaml recommendationservice charts/microservice
helm install -f values/productcatalog-service-values.yaml productcatalogservice charts/microservice
helm install -f values/shipping-service-values.yaml shippingservice charts/microservice
helm install -f values/ad-service-values.yaml adservice charts/microservice
helm install -f values/checkout-service-values.yaml checkoutservice charts/microservice
helm install -f values/frontend-values.yaml frontendservice charts/microservice
uninstall.sh
helm uninstall rediscart

helm uninstall emailservice
helm uninstall cartservice
helm uninstall currencyservice
helm uninstall paymentservice
helm uninstall recommendationservice
helm uninstall productcatalogservice
helm uninstall shippingservice
helm uninstall adservice
helm uninstall checkoutservice
helm uninstall frontendservice
- Make scripts executable
chmod u+x fileName
- This can be done more elegantly using a Helmfile
What Is a Helmfile?
- A declarative way for deploying helm charts.
- It lets us declare a definition of an entire K8s cluster in a YAML file.
- Can define multiple Helm releases in it and then change specifications of each release depending on the application or the type of environment (dev, staging, etc).
Install helmfile
brew install helmfile
helmfile.yaml
releases:
  - name: rediscart
    chart: charts/redis
    values:
      - values/redis-values.yaml
      - appReplicas: "1"
      - volumeName: "redis-cart-data"

  - name: emailservice
    chart: charts/microservice
    values:
      - values/email-service-values.yaml

  - name: cartservice
    chart: charts/microservice
    values:
      - values/cart-service-values.yaml

  - name: currencyservice
    chart: charts/microservice
    values:
      - values/currency-service-values.yaml

  - name: paymentservice
    chart: charts/microservice
    values:
      - values/payment-service-values.yaml

  - name: recommendationservice
    chart: charts/microservice
    values:
      - values/recommendation-service-values.yaml

  - name: productcatalogservice
    chart: charts/microservice
    values:
      - values/productcatalog-service-values.yaml

  - name: shippingservice
    chart: charts/microservice
    values:
      - values/shipping-service-values.yaml

  - name: adservice
    chart: charts/microservice
    values:
      - values/ad-service-values.yaml

  - name: checkoutservice
    chart: charts/microservice
    values:
      - values/checkout-service-values.yaml

  - name: frontendservice
    chart: charts/microservice
    values:
      - values/frontend-values.yaml
Deploy Helm Charts
helmfile sync
helmfile list
Uninstall releases
helmfile destroy
Wrap Up
- Where to host helm charts?
- Hosted in a Git repository
- 2 Options
- Package it and host it with your application code
- Have a separate Git repo for Helm Charts
- 2 Options
- How does this fit into the DevOps workflow?
- DevOps engineer will create the charts for the developers
- Create blueprint for microservice deployment
- Create a separate repo for that
- Hand it over to the developers once its been configured
- Will create charts and configurations
- The developers will be the users of these helm charts
- They can tweak values
- Environmental variables
- App versions
- Ports
- They can use this to deploy their microservices into the cluster usually by integrating this into their CI/CD pipeline
- DevOps engineer will create the charts for the developers
- DevOps engineers act as facilitators for Developers and Operations Teams
- Creating configurations and programs for these teams