Ansible
Repositories
Introduction to Ansible
- Tool to automate IT tasks
Why Ansible?
- Scenarios
- Want to update app version on multiple servers
- Upgrade Docker version on multiple servers
- Repetitive system admin tasks
- Advantages of Ansible
- Execute tasks from your own machine
- Configuration/Installation/Deployment steps in a single YAML file
- Re-use same file multiple times and for different environments
- More reliable and less likely for errors
- Ansible supports all infrastructure
- Ansible is agentless
- You don't have to install anything on target machines
- Install on your control machine and this manages a fleet of target machines
- No deployment effort in the beginning
- No upgrade effort
Ansible Architecture
- Modules
- Small programs that do the actual work
- Get pushed to the target server
- Do their work and get removed
- One module does one small specific task eg. install Nginx, create or copy file, start docker container, etc
- Ansible uses YAML
- Modules are granular and specific
- For complex applications
- You need multiple modules in a certain sequence, grouped together to represent that one whole configuration
- That's where Ansible Playbooks come in
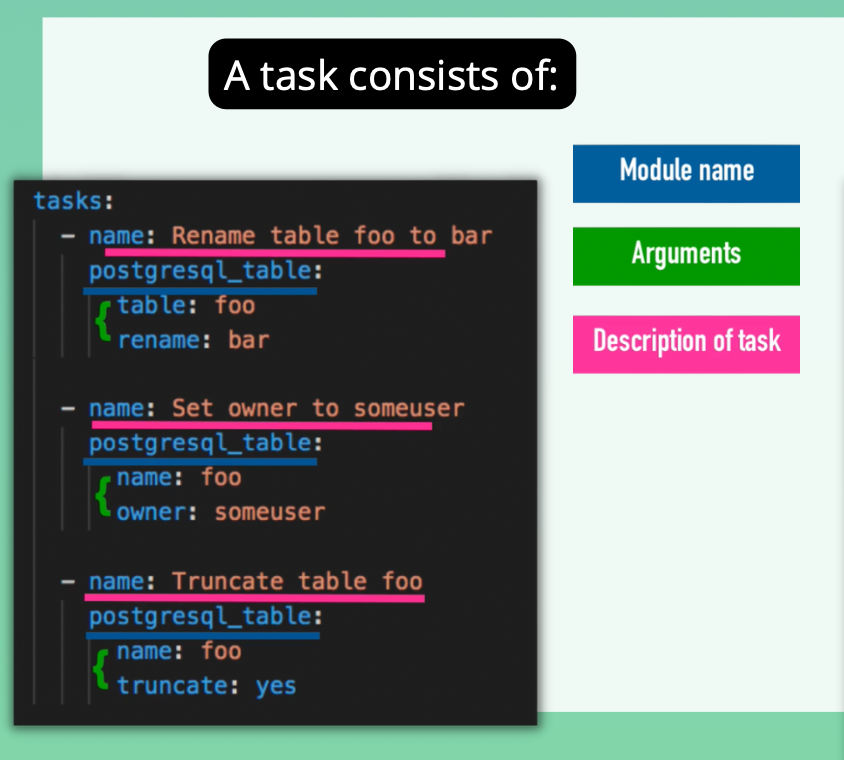
- The sequential modules are grouped in tasks
- We use the hosts attribute to specify where these configs should be executed
- Can define your own variables
- Play is a block that specifies which tasks should be executed, which host they should be executed on and with which user
- Can have multiple plays dependent on each other or that need to be executed in a sequence
- A file that contains multiple plays is called a
Playbook - Playbook describes:
- how and in which order
- at what time and where (on which machines)
- what (the modules) should be executed
- It basically orchestrates the module execution
- Can name plays using the name attribute
- Where do the host values come from
- That reference is defined in Ansible's inventory list
- Inventory: all machines involved in task execution
- Contains groups of multiple IP addresses or host names
- The host names of the IP addresses could be Cloud servers, virtual or bare metal server
Ansible for Docker
- In Ansible, you can create an alternative to a Dockerfile which is more powerful
- Can create a Docker container
- Can create a Vagrant container
- Can deploy to a Cloud instance or Bare metal server
- Can reproduce the App across many environments
- Can manage both the host and the docker container with Ansible
Ansible Tower
- Is a UI dashboard from Red Hat
- Used to centrally store automation tasks across teams, configure permissions, manage inventory, etch
Alternatives
- Puppet
- Chef
| Ansible | Puppet and Chef |
|---|---|
| Simple YAML | Ruby which is more difficult to learn |
| Agentless | Installation needed |
Install Ansible
- Can install it locally
- Connect to target servers and execute Ansible commands or Playbooks on servers
- Install it on remote server
- Manage remote servers on Ansible installed on that remote server
- Use case
- When servers are in a private network and you can't administer the target servers from within another network
brew install ansible
ansible --version
- Ansible is written in Python so it needs Python to run
- For custom functionality, you can use Python
Setup managed server to configure with Ansible
- Create 2 droplets on DigitalOcean
- We need to connect Ansible to both droplets
- Connects to targets using SSH
- For Linux servers, Python has to be installed
- Python will be installed on our Digitalocean droplets (Python3)
- For Windows, Powershell has to be installed
Ansible inventory and Ansible AD HOC commands
- We have to tell Ansible the host names or IPs of the servers it has to manage.
- We do that with a hosts file called an Inventory
- Ansible Inventory File
- File containing data about the ansible client servers
- "hosts" meaning the managed servers
- Default location for file :/etc/ansible/hosts
hosts
64.226.107.81 ansible_ssh_private_key_file=~/.ssh/devops-droplet ansible_user=root
159.223.26.73 ansible_ssh_private_key_file=~/.ssh/devops-droplet ansible_user=root
Ansible ad-hoc commands
ad-hoccommands aren't stored for future uses- Are a fast way to interact with the desired servers
ansible [pattern] -m [module] -a "[module options]"
[pattern]= targeting hosts and groupsall= default group which contains every hostmodule= discrete units of code
Test Connection
ansible all -i hosts -m ping
Grouping Hosts
- You can put each host in more than one group
- You can create groups that track:
- Where - a datacenter/region
- What - database servers, web servers, etc
- When - which stage eg. dev, test, prod environments
hosts
[droplet]
64.226.107.81 ansible_ssh_private_key_file=~/.ssh/devops-droplet ansible_user=root
159.223.26.73 ansible_ssh_private_key_file=~/.ssh/devops-droplet ansible_user=root
ansible droplet -i hosts -m ping
ansible 64.226.107.81 -i hosts -m ping
Refactor hosts
[droplet]
64.226.107.81
159.223.26.73

[droplet:vars]
ansible_ssh_private_key_file=~/.ssh/devops-droplet
ansible_user=root
Configure AWS EC2 server with Ansible
Add EC2 Instances to Inventory
- Can use DNS names and not just IPs
- Instances already have Python 2
sudo yum install python3
hosts
[ec2]
ec2-107-20-83-49.compute-1.amazonaws.com
ec2-34-228-26-193.compute-1.amazonaws.com ansible_python_interpreter=/usr/bin/python3

[ec2:vars]
ansible_ssh_private_key_file=~/.ssh/devops-ec2.pem
ansible_user=ec2-user
Managing host key checking and SSH Keys
- Is enabled by default in Ansible
- It guards against server spoofing and MITM attacks
- We want to bypass interaction mode
Authorized Keys & Known Hosts
- We have 2 options based on
- Long-lived servers
- Ephemeral or temporary servers
- Long-lived
- Can do check once (for each server) on the server that Ansible will be running on
- How Host Key Checking Works
- The remote server must allow our machine to connect
- Our machine must also recognize the server as a valid host
- Our machine must add the server information to the
known_hostsfile~/.ssh/known_hosts
Add entry to known_hosts
ssh-keyscan -H 165.22.201.197 >> ~/.ssh/known_hosts
- The remote server must also authenticate the machine that we're trying to SSH from
- It must have our public SSH key
Can copy public key to remote authorized_keys file
ssh-copy-id root@188.166.30.219
Disable Host Key Checking
- Is less secure
- Can use this approach if your infrastructure is ephemeral
- Servers are dynamically created and destroyed
- We'll use Ansible's config file
- Config File Default Locations
/etc/ansible/ansible.cfg~/.ansible.cfg
ansible.cfg
[defaults]
host_key_checking = False
Run
ansible droplet -i hosts -m ping # if in default location
ansible droplet -i hosts -c path -m ping
Introduction to Playbooks
- Ansible is an IaC tool
- Playbook
- Ordered list of tasks
- Plays and tasks run in order from top to bottom
- Can have multiple plays
- A Play is a group of tasks
- e.g. we can have a Play for all Db servers where we install MySQL
- Or another Play for all the Web servers where we install Nginx
Write A Simple Playbook
- Tasks for Play
- Install nginx
- Start nginx
my-playbook.yaml
---
- name: Configure nginx web server
  hosts: webserver
  tasks:
    - name: install nginx server
      apt:
        name: nginx
        state: latest
    - name: start nginx server
      service:
        name: nginx
        state: started
Execute Playbook
ansible-playbook -i hosts my-playbook.yaml
-
Gather Facts Module
- is automatically called by playbooks
- Used to gather useful variables about the remote hosts that can be used in playbooks
- So Ansible provides many facts about the system automatically
-
SSH and check if nginx is running
ps aux | grep nginx
Install Specific Version
my-playbook.yaml
---
- name: Configure nginx web server
  hosts: webserver
  tasks:
    - name: install nginx server
      apt:
        name: nginx=1.18.0-6ubuntu14
        state: present
    - name: start nginx server
      service:
        name: nginx
        state: started
RegEx
---
- name: Configure nginx web server
  hosts: webserver
  tasks:
    - name: install nginx server
      apt:
        name: nginx=1.18*
        state: present
    - name: start nginx server
      service:
        name: nginx
        state: started
Ansible Idempotency
- Most Ansible modules check whether the desired state has already been achieved
- They exit without performing any actions
Uninstall nginx
---
- name: Configure nginx web server
  hosts: webserver
  tasks:
    - name: uninstall nginx server
      apt:
        name: nginx
        state: absent
    - name: start nginx server
      service:
        name: nginx
        state: stopped
Ansible modules
- Is a reusable piece of code
- List of all modules
Ansible collections
Major Changes In Ansible Distribution
- Ansible 2.9 and earlier: Classic Ansible
- All modules were included
- Single repository
ansible/ansible - Single package called
ansible - Combined Ansible Code and Ansible Modules and Plugins
- But this was modularized
- Ansible 2.10 and later
ansible/ansible(ansible-base) repo contains the core Ansible programs- Modules and Plugins moved into various collections
- The Ansible Code (ansible-base package) and Ansible Modules & Plugins (ansible package) have been split
What is a collection?
- Is a packaging format for bundling and distributing Ansible content
- Can be released and installed independent of other collections
- Collection
- Playbook
- Plugins
- Modules
- Can be packaged into a single bundle
- Everything in ansible is now part of a collection
- e.g.
ansible.builtin
- e.g.
- Ansible Plugins
- Pieces of code that add to Ansible's functionality or modules
- You can write your own plugins
ansible-galaxy collection list
Ansible Galaxy
- Collections group modules and plugins
- Modules and plugins are code
- Where is this content hosted and shared?
- Where do we get Ansible Collections?
- Ansible Galaxy is one of the main hubs of collections
- For finding and sharing Ansible community content
- Ansible galaxy
- Also a CLI utility to install individual collections
ansible-galaxy install <collection name>
- Can use installation to update collections
- You can create your own collection
- For bigger Ansible projects
- Collections follow a simple data structure
- required: a galaxy.yml file (containing metadata) at the root level of the collection
Project: Deploy NodeJS Application - 1
Automate Node App Deployment
- Steps
- Create a Droplet
- Write Ansible Playbook
- Install node and npm on server
- Copy Node artifact and unpack
- Start application
- Verify App running successfully
Write Ansible Playbook
Install node and npm
---
- name: Install node and npm
  hosts: 64.226.107.81
  tasks:
    - name: Update apt repo and cache
      ansible.builtin.apt: update_cache=yes force_apt_get=yes cache_valid_time=3600
    - name: Install nodejs and npm
      ansible.builtin.apt:
        pkg:
          - nodejs
          - npm
Copy and unpack tar file
---
- name: Install node and npm
  hosts: 64.226.107.81
  tasks:
    - name: Update apt repo and cache
      ansible.builtin.apt: update_cache=yes force_apt_get=yes cache_valid_time=3600
    - name: Install nodejs and npm
      ansible.builtin.apt:
        pkg:
          - nodejs
          - npm

- name: Deploy nodejs app
  hosts: 64.226.107.81
  tasks:
    - name: Copy nodejs folder to a server
      ansible.builtin.copy:
        src: /Users/alfredamoah/IdeaProjects/simple-nodejs/nodejs-app-1.0.0.tgz
        dest: /root/app-1.0.0.tgz
    - name: Unpack the nodejs file
      ansible.builtin.unarchive:
        src: /root/app-1.0.0.tgz
        dest: /root/
        remote_src: yes
-
By default, the src under the unarchive points to the local machine
-
remote_srcpoints to the host -
We can run copy and unarchive in one step
---
- name: Install node and npm
  hosts: 64.226.107.81
  tasks:
    - name: Update apt repo and cache
      ansible.builtin.apt: update_cache=yes force_apt_get=yes cache_valid_time=3600
    - name: Install nodejs and npm
      ansible.builtin.apt:
        pkg:
          - nodejs
          - npm

- name: Deploy nodejs app
  hosts: 64.226.107.81
  tasks:
    - name: Unpack the nodejs file
      ansible.builtin.unarchive:
        src: /Users/alfredamoah/IdeaProjects/simple-nodejs/nodejs-app-1.0.0.tgz
        dest: /root/
Project: Deploy Nodejs Application - 2
Start Node App
---
- name: Install node and npm
  hosts: 64.226.107.81
  tasks:
    - name: Update apt repo and cache
      ansible.builtin.apt: update_cache=yes force_apt_get=yes cache_valid_time=3600
    - name: Install nodejs and npm
      ansible.builtin.apt:
        pkg:
          - nodejs
          - npm

- name: Deploy nodejs app
  hosts: 64.226.107.81
  tasks:
    - name: Unpack the nodejs file
      ansible.builtin.unarchive:
        src: /Users/alfredamoah/IdeaProjects/simple-nodejs/nodejs-app-1.0.0.tgz
        dest: /root/
    - name: Install dependencies
      community.general.npm:
        path: /root/package
    - name: Start the application
      ansible.builtin.command:
        chdir: /root/package/app
        cmd: node server
      async: 1000
      poll: 0
    - name: Ensure app is running
      ansible.builtin.shell: ps aux | grep node
      register: app_status
    - ansible.builtin.debug: msg={{app_status.stdout_lines}}
- command and shell are used to run commands
- shell module executes the commands in the shell. Can use
- pipe
| - redirects
>or< - boolean
&&,|| - Envs
- pipe
- command is more secure. Not prone to shell injection
- Commands aren't run directly through shell
Return Values of Modules
- Ansible modules normally return data
- This data can be registered into a variable
debug module
-
Print statements during execution
-
Useful for debugging variables or expressions
-
command and shell modules aren't idempotent
-
Ansible doesn't know about their state
Python vs Ansible
- In Python, we need to check the status
- Ansible and Terraform handle that state check for us
Project: Deploy NodeJS Application - 3
Executing Tasks With A Different User
- Shouldn't execute or start app as root
- If someone hacks into your app, they will be able to do much more damage
---
- name: Install node and npm
  hosts: 64.226.107.81
  tasks:
    - name: Update apt repo and cache
      ansible.builtin.apt: update_cache=yes force_apt_get=yes cache_valid_time=3600
    - name: Install nodejs and npm
      ansible.builtin.apt:
        pkg:
          - nodejs
          - npm

- name: Create new linux user for node app
  hosts: 64.226.107.81
  tasks:
    - name: Create linux user
      ansible.builtin.user:
        name: alfred
        comment: Node User
        group: admin

- name: Deploy nodejs app
  hosts: 64.226.107.81
  become: True
  become_user: alfred
  tasks:
    - name: Unpack the nodejs file
      ansible.builtin.unarchive:
        src: /Users/alfredamoah/IdeaProjects/simple-nodejs/nodejs-app-1.0.0.tgz
        dest: /home/alfred
    - name: Install dependencies
      community.general.npm:
        path: /home/alfred/package
    - name: Start the application
      ansible.builtin.command:
        chdir: /home/alfred/package/app
        cmd: node server
      async: 1000
      poll: 0
    - name: Ensure app is running
      ansible.builtin.shell: ps aux | grep node
      register: app_status
    - ansible.builtin.debug: msg={{app_status.stdout_lines}}
Ansible variables make your playbook customizable
Registered variables
- Create variables from the output of an Ansible task
- This variable can be used in any later tasks in your play
Parameterize Playbook
- Referencing variables
- If you start a value with , you must quote the whole expression to create valid YAML syntax
Define vars in the Playbook
- name: Create new linux user for node app
  hosts: 64.226.107.81
  vars:
    - key: value
Passing variables on the command line
ansible-playbook -i hosts deploy-node.yaml --extra-vars "version=1.0.0 location=/users/home/"

# Can use -e
External Variables File
project-vars- Can be a YAML file
version: 1.0.0
location: /Users/alfredamoah/IdeaProjects/simple-nodejs
linux_name: alfred
user_home_dir: /home/{{linux_name}}
deploy-node.yaml
---
- name: Install node and npm
  hosts: 64.226.107.81
  tasks:
    - name: Update apt repo and cache
      ansible.builtin.apt: update_cache=yes force_apt_get=yes cache_valid_time=3600
    - name: Install nodejs and npm
      ansible.builtin.apt:
        pkg:
          - nodejs
          - npm

- name: Create new linux user for node app
  hosts: 64.226.107.81
  vars_files:
    - project-vars
  tasks:
    - name: Create linux user
      ansible.builtin.user:
        name: "{{linux_name}}"
        comment: Node User
        group: admin

- name: Deploy nodejs app
  hosts: 64.226.107.81
  become: True
  become_user: "{{linux_name}}"
  vars_files:
    - project-vars
  tasks:
    - name: Unpack the nodejs file
      ansible.builtin.unarchive:
        src: "{{location}}/nodejs-app-{{version}}.tgz"
        dest: "{{user_home_dir}}"
    - name: Install dependencies
      community.general.npm:
        path: "{{user_home_dir}}/package"
    - name: Start the application
      ansible.builtin.command:
        chdir: "{{user_home_dir}}/package/app"
        cmd: node server
      async: 1000
      poll: 0
    - name: Ensure app is running
      ansible.builtin.shell: ps aux | grep node
      register: app_status
    - ansible.builtin.debug: msg={{app_status.stdout_lines}}
Project: Deploy Nexus - 1
- Before, we did this manually
- Create a Droplet
- SSH into server and execute
- Download Nexus binary and unpack
- Run Nexus application using Nexus User
- We'll automate these steps using Ansible
- Can execute repeatedly
First Play
---
- name: Install java and net-tools
  hosts: 134.122.73.157
  tasks:
    - name: Update apt repo and cache
      ansible.builtin.apt: update_cache=yes force_apt_get=yes cache_valid_time=3600
    - name: Install Java 8
      ansible.builtin.apt: name=openjdk-8-jre-headless
    - name: Install net-tools
      ansible.builtin.apt: name=net-tools
Second Play
---
- name: Install java and net-tools
  hosts: 134.122.73.157
  tasks:
    - name: Update apt repo and cache
      ansible.builtin.apt: update_cache=yes force_apt_get=yes cache_valid_time=3600
    - name: Install Java 8
      ansible.builtin.apt: name=openjdk-8-jre-headless
    - name: Install net-tools
      ansible.builtin.apt: name=net-tools

- name: Download and unpack Nexus installer
  hosts: 134.122.73.157
  tasks:
    - name: Download Nexus
      ansible.builtin.get_url:
        url: https://download.sonatype.com/nexus/3/latest-unix.tar.gz
        dest: /opt/
      register: download_result
    - name: Untar nexus installer
      ansible.builtin.unarchive:
        src: "{{download_result.dest}}"
        dest: /opt/
        remote_src: yes
    - name: Find nexus folder
      ansible.builtin.find:
        paths: /opt
        pattern: "nexus-*"
        file_type: directory
      register: find_result
    - name: Rename nexus folder
      ansible.builtin.shell: mv {{find_result.files[0].path}} /opt/nexus
findmodule- Return a list of files based on specific criteria
- For Windows targets: "win_find" module
Conditionals In Nexus
- name: Download and unpack Nexus installer
  hosts: 134.122.73.157
  tasks:
    - name: Check nexus folder stats
      ansible.builtin.stat:
        path: /opt/nexus
      register: stat_result
    - name: Download Nexus
      ansible.builtin.get_url:
        url: https://download.sonatype.com/nexus/3/latest-unix.tar.gz
        dest: /opt/
      register: download_result
    - name: Untar nexus installer
      ansible.builtin.unarchive:
        src: "{{download_result.dest}}"
        dest: /opt/
        remote_src: yes
      when: not stat_result.stat.exists
    - name: Find nexus folder
      ansible.builtin.find:
        paths: /opt
        pattern: "nexus-*"
        file_type: directory
      register: find_result
    - name: Rename nexus folder
      ansible.builtin.shell: mv {{find_result.files[0].path}} /opt/nexus
      when: not stat_result.stat.exists
Project: Deploy Nexus - 2
Third Play: Make nexus user owner of nexus and sonatype folders
- Need to create user and group
- Then we assign user to that group
groupmodule- Manages presence of groups on a host
- For Windows targets:
win_groupmodule
usermodule- Manages user accounts and user attributes
- For Windows targets:
win_usermodule
- name: Create nexus user to own nexus folders
  hosts: 134.122.73.157
  tasks:
    - name: Ensure group nexus exists
      ansible.builtin.group:
        name: nexus
        state: present
    - name: Create nexus user
      ansible.builtin.user:
        name: nexus
        group: nexus
    - name: Make nexus user owner of nexus folder
      ansible.builtin.file:
        path: /opt/nexus
        state: directory
        owner: nexus
        group: nexus
        recurse: yes
    - name: Make nexus user owner of sonatype-work folder
      ansible.builtin.file:
        path: /opt/sonatype-work
        state: directory
        owner: nexus
        group: nexus
        recurse: yes
Fourth Play: Start Nexus with Nexus user
- Can use
blockinfilemodule
- name: Start nexus with nexus user
  hosts: 134.122.73.157
  become: True
  become_user: nexus
  tasks:
    - name: Set run_as_user nexus
      blockinfile:
        path: /opt/nexus/bin/nexus.rc
        block: |
          run_as_user="nexus"
- Using
lineinfile: When you want to change a single line
- name: Start nexus with nexus user
  hosts: 134.122.73.157
  become: True
  become_user: nexus
  tasks:
    - name: Set run_as_user nexus
      ansible.builtin.lineinfile:
        path: /opt/nexus/bin/nexus.rc
        regexp: '^#run_as_user=""'
        line: run_as_user="nexus"
    - name: Start nexus
      ansible.builtin.command: /opt/nexus/bin/nexus start
Fifth Play: Verify Nexus Is running
- Nexus needs more than 1gb of memory
- name: Verify nexus running
  hosts: nexus_server
  tasks:
    - name: Check with ps
      ansible.builtin.shell: ps aux | grep nexus
      register: app_status
    - ansible.builtin.debug: msg={{app_status.stdout_lines}}
    - name: Wait one minute
      ansible.builtin.pause:
        minutes: 1
    - name: Check with netstat
      ansible.builtin.shell: netstat -plnt
      register: app_status
    - ansible.builtin.debug: msg={{app_status.stdout_lines}}
- Modules for waiting
pausewait_for
Ansible configuration default inventory file
- Create a Git repo
- Your Playbooks should be stored safely in this remote repo
- Git repo is your single source of truth for your Ansible playbooks
- Great for working in teams
Configure Inventory Default Location
ansible.cfg
[defaults]
host_key_checking = False
inventory = hosts
Project: Run Docker Applications—Part 1
- EC2 - Amazon Linux Image
- DigitalOcean Droplet - Linux Ubuntu
- Have different configs
- Overview
- Create an AWS EC2 Instance with Terraform
- Configure inventory file to connect to AWS EC2 Instance
- Install Docker and docker-compose
- Copy docker-compose file to server
- Start Docker containers
First Play: Install python3 and Docker
yumdoesn't work withPython3- Ansible requires
Python3 - Solution
- Globally, use
Python3interpreter - Switch to
Python2when needed- when installing
python3 - when using
yumto install packages
- when installing
- Globally, use
ansible.cfg
[defaults]
host_key_checking = False
inventory = hosts

interpreter_python = /usr/bin/python3
deploy-docker.yaml
---
- name: Install python3, docker and docker-compose
  hosts: docker_server
  become: yes
  gather_facts: False
  tasks:
    - name: Install python3 and docker
      vars:
        ansible_python_interpreter: /usr/bin/python
      ansible.builtin.yum:
        name:
          - python3
          - docker
        update_cache: yes
        state: present
    - name: Install Docker-compose
      ansible.builtin.get_url:
        url: https://github.com/docker/compose/releases/download/1.29.2/docker-compose-Linux-{{lookup('pipe', 'uname -m')}}
        dest: /usr/local/bin/docker-compose
        mode: +x
    - name: Start docker daemon
      ansible.builtin.systemd:
        name: docker
        state: started


- name: Add ec2-user to docker group
  hosts: docker_server
  become: yes
  tasks:
    - name: Add ec2-user to docker group
      ansible.builtin.user:
        name: ec2-user
        groups: docker
        append: yes
    - name: Reconnect to server session
      ansible.builtin.meta: reset_connection
Project: Run Docker Applications - Part 2
commandandshell- use only when there is no appropriate Ansible module available because they don't have state management- community.docker.docker_image
namespace.collection.module_namenamespace.collection.plugin_name
FQCN- Fully Qualified Collection Name- To specify the exact source of a module/plugin
ansible.builtin= default namespace and collection
Pull Docker Image
- To use modules like
docker_imagewe need to install the python docker package - On the DO droplet that had
python3preinstalled, we won't have to install the docker module - Servers with different Linux distributions require different configurations
---
- name: Install python3, docker and docker-compose
  hosts: docker_server
  become: yes
  gather_facts: False
  tasks:
    - name: Install python3 and docker
      vars:
        ansible_python_interpreter: /usr/bin/python
      ansible.builtin.yum:
        name:
          - python3
          - docker
        update_cache: yes
        state: present
    - name: Install Docker-compose
      get_url:
        url: https://github.com/docker/compose/releases/download/1.29.2/docker-compose-Linux-x86_64
#        url: https://github.com/docker/compose/releases/download/1.29.2/docker-compose-Linux-{{lookup('pipe', 'uname -m')}}
        dest: /usr/local/bin/docker-compose
        mode: +x
    - name: Start docker daemon
      ansible.builtin.systemd:
        name: docker
        state: started
    - name: Install docker python module
      ansible.builtin.pip:
        name:
          - docker
          - docker-compose

- name: Add ec2-user to docker group
  hosts: docker_server
  become: yes
  tasks:
    - name: Add ec2-user to docker-group
      ansible.builtin.user:
        name: ec2-user
        groups: docker
        append: yes
    - name: Reconnect to server session
      ansible.builtin.meta: reset_connection

- name: Test docker pull
  hosts: docker_server
  tasks:
    - name: Pull redis
      community.docker.docker_image:
        name: redis
        source: pull
The Third Play
- Run app with docker compose
- For docker password, you can use interactive prompts
- Interactive input: prompts
- Playbook prompts the user for certain input
- Prompting the user for variables lets you avoid recording sensitive data
- name: Start docker containers
  hosts: docker_server
  vars_prompt:
    - name: docker_password
      prompt: Enter password for docker registry
  tasks:
    - name: Copy docker compose
      ansible.builtin.copy:
        src: /Users/alfredamoah/IdeaProjects/java-maven-app/docker-compose.yaml
        dest: /home/ec2-user/docker-compose.yaml
    - name: Docker login
      community.docker.docker_login:
        registry_url: https://index.docker.io/v1/
        username: alfredasare
        password: "{{docker_password}}"
    - name: Start container from compose
      community.docker.docker_compose:
        project_src: /home/ec2-user
All Plays
---
- name: Install python3, docker and docker-compose
  hosts: docker_server
  become: yes
  gather_facts: False
  tasks:
    - name: Install python3 and docker
      vars:
        ansible_python_interpreter: /usr/bin/python
      ansible.builtin.yum:
        name:
          - python3
          - docker
        update_cache: yes
        state: present
    - name: Install Docker-compose
      get_url:
        url: https://github.com/docker/compose/releases/download/1.29.2/docker-compose-Linux-x86_64
#        url: https://github.com/docker/compose/releases/download/1.29.2/docker-compose-Linux-{{lookup('pipe', 'uname -m')}}
        dest: /usr/local/bin/docker-compose
        mode: +x
    - name: Start docker daemon
      ansible.builtin.systemd:
        name: docker
        state: started
    - name: Install docker python module
      ansible.builtin.pip:
        name:
          - docker
          - docker-compose

- name: Add ec2-user to docker group
  hosts: docker_server
  become: yes
  tasks:
    - name: Add ec2-user to docker-group
      ansible.builtin.user:
        name: ec2-user
        groups: docker
        append: yes
    - name: Reconnect to server session
      ansible.builtin.meta: reset_connection

- name: Start docker containers
  hosts: docker_server
  vars_files:
    - project-vars
  tasks:
    - name: Copy docker compose
      ansible.builtin.copy:
        src: /Users/alfredamoah/IdeaProjects/java-maven-app/docker-compose.yaml
        dest: /home/ec2-user/docker-compose.yaml
    - name: Docker login
      community.docker.docker_login:
        registry_url: https://index.docker.io/v1/
        username: alfredasare
        password: "{{docker_password}}"
    - name: Start container from compose
      community.docker.docker_compose:
        project_src: /home/ec2-user
        state: present
- Try to make playbooks as reusable as possible
Project: Terraform and Ansible
Integrate Ansible Playbook Execution In Terraform
- So far...
- We created our infrastructure using Terraform
- We switched to our Ansible project to configure our infrastructure
- Manual tasks between provisioning and configuring
- We get the IP address manually from TF output
- Update the
hostsfile manually - Execute ansible command
- We can configure the server and handover from TF to Ansible inside the Terraform configuration file
- We'll need a provisioner in the EC2 instance block
- Terraform Provisioners
local-execremote-execfile
- We're using
local-exec- Invokes a local executable after a resource is created
- Is invoked on the machine running TF, not on the resource
Terraform
# EC2 instance
resource "aws_instance" "myapp-server" {
  ami = data.aws_ami.latest-amazon-linux-image.id
  instance_type = var.instance_type

  subnet_id = aws_subnet.myapp-subnet-1.id
  vpc_security_group_ids = [aws_default_security_group.myapp-default-sg.id]
  availability_zone = var.avail_zone

  associate_public_ip_address = true
  key_name = aws_key_pair.ssh-key.key_name

  tags = {
    Name = "${var.env_prefix}-server"
  }

  provisioner "local-exec" {
    working_dir = "/Users/alfredamoah/GolandProjects/ansible-learn"
    command = "ansible-playbook --inventory ${self.public_ip}, --private-key ${var.ssh_key_private} --user ec2-user deploy-docker.yaml"
  }
}
--inventorytakes a file or a comma-separated list of IP addresses- If you want to run docker with a different user, you need to use sudo because the new user isn't added to the docker group
Wait For EC2 To Be Fully Initialized
- Using provisioners is not recommended because TF can't maintain the state
- One issue we have is the timing issue
- EC2 might not be initialized before commands are run
- Ansible needs to check first whether EC2 is ready
Using null_resource
- Can separate provisioner from instance using the null_resource
terraform
# EC2 instance
resource "aws_instance" "myapp-server" {
  ami = data.aws_ami.latest-amazon-linux-image.id
  instance_type = var.instance_type

  subnet_id = aws_subnet.myapp-subnet-1.id
  vpc_security_group_ids = [aws_default_security_group.myapp-default-sg.id]
  availability_zone = var.avail_zone

  associate_public_ip_address = true
  key_name = aws_key_pair.ssh-key.key_name

  tags = {
    Name = "${var.env_prefix}-server"
  }
}

# Null Resource
resource "null_resource" "configure_server" {
  triggers = {
    trigger = aws_instance.myapp-server.public_ip
  }

  provisioner "local-exec" {
    working_dir = "../ansible"
    command = "ansible-playbook --inventory ${aws_instance.myapp-server.public_ip}, --private-key ${var.ssh_key_private} --user ec2-user deploy-docker-new-user.yaml"
  }
}
- Since we've added a new provider we have to run terraform init
Dynamic inventory for EC2 servers
Why Dynamic Inventory?
- Managing an inventory which fluctuates over time
- Hosts spinning up and shutting down all the time
- e.g. auto-scaling to accommodate for business demands
- Hard-coding the IP addresses is not a good idea
- We want to dynamically set them
Overview
- Create 3 EC2 instances with Terraform
- Connect to these servers with Ansible without hard-coding the IP addresses
Terraform - Create EC2 Instances
main.tf
# EC2 instance
resource "aws_instance" "myapp-server" {
  ami = data.aws_ami.latest-amazon-linux-image.id
  instance_type = var.instance_type

  subnet_id = aws_subnet.myapp-subnet-1.id
  vpc_security_group_ids = [aws_default_security_group.myapp-default-sg.id]
  availability_zone = var.avail_zone

  associate_public_ip_address = true
  key_name = aws_key_pair.ssh-key.key_name

  tags = {
    Name = "${var.env_prefix}-server"
  }
}

resource "aws_instance" "myapp-server-two" {
  ami = data.aws_ami.latest-amazon-linux-image.id
  instance_type = var.instance_type

  subnet_id = aws_subnet.myapp-subnet-1.id
  vpc_security_group_ids = [aws_default_security_group.myapp-default-sg.id]
  availability_zone = var.avail_zone

  associate_public_ip_address = true
  key_name = aws_key_pair.ssh-key.key_name

  tags = {
    Name = "${var.env_prefix}-server-two"
  }
}

resource "aws_instance" "myapp-server-three" {
  ami = data.aws_ami.latest-amazon-linux-image.id
  instance_type = var.instance_type

  subnet_id = aws_subnet.myapp-subnet-1.id
  vpc_security_group_ids = [aws_default_security_group.myapp-default-sg.id]
  availability_zone = var.avail_zone

  associate_public_ip_address = true
  key_name = aws_key_pair.ssh-key.key_name

  tags = {
    Name = "${var.env_prefix}-server-three"
  }
}
Inventory Plugin vs Inventory Script
- We'll need functionality that
- Connects to AWS account
- Gets server information
- Options
- Inventory plugins
- Inventory scripts
- Plugins over scripts
- Plugins make use of Ansible features like state management
- Plugins are written in YAML and scripts are written in Python
- Plugins/Scripts specific to infrastructure provider
- You can use
ansible-doc -t inventory -lto see the list of available plugins - For AWS infrastructure, you need a specific plugin/script for AWS
- Need
boto3andbotocore
- You can use
ansible.cfg
[defaults]
host_key_checking = False
inventory = hosts
enable_plugins = amazon.aws.aws_ec2

interpreter_python = /usr/bin/python3
Write Plugin Configuration
- Config file must end with
aws_ec2.yaml - To test plugin
inventory_aws_ec2.yaml
---
plugin: aws_ec2
regions:
  - us-east-1
ansible-inventory -i inventory_aws_ec2.yaml --list
ansible-inventory -i inventory_aws_ec2.yaml --graph
ansible-inventory- Used to display or dump the configured inventory as Ansible sees it
Assign Public DNS To EC2 Instances
- We need the public DNS of the servers
- Enable on VPC
main.tf
# VPC
resource "aws_vpc" "myapp-vpc" {
  cidr_block = var.vpc_cidr_block
  enable_dns_hostnames = true

  tags = {
    Name: "${var.env_prefix}-vpc",
  }
}
Configure Ansible To Use Dynamic Inventory
- The host name used is from the
ansible-inventorygraph command - Need
remote_userand private_key for hosts
ansible.cfg
[defaults]
host_key_checking = False
inventory = hosts
enable_plugins = amazon.aws.aws_ec2

interpreter_python = /usr/bin/python3

remote_user = ec2-user
private_key_file = ~/.ssh/id_rsa
Run Playbook
ansible-playbook -i inventory_aws_ec2.yaml deploy-docker-new-user.yaml
Target Only Specific Servers
- We can use filters
---
plugin: aws_ec2
regions:
  - us-east-1
filters:
  tag:Name: dev*
  instance-state-name: running
Create Dynamic Groups
- We want to create dynamic groups: eg. dev group and prod group
---
plugin: aws_ec2
regions:
  - us-east-1
keyed_groups:
  - key: tags
    prefix: tag
  - key: instance_type
    prefix: instance_type
Run
ansible-playbook -i inventory_aws_ec2.yaml deploy-docker-new-user.yaml
- We can then use the new groups as host names in the playbook
Project: Deploying Application in K8s
- Overview
- Create K8s cluster on AWS EKS
- Configure Ansible to connect to EKS cluster
- Deploy
DeploymentandServicecomponent
Create EKS cluster with Terraform
- Branch:
feature/eks
tf apply
Create a Namespace In The Cluster
- We use localhost as the host
- We're executing the playbook locally but we're actually connecting to a K8s cluster so we don't need a specific worker node or host or K8s cluster endpoint because we'll define it separately
- How does Ansible know
- Which cluster to connect to?
- How to connect to it?
- Default location for kubeconfig:
~/.kube/config.json
---
- name: Deploy app in new namespace
  hosts: localhost
  tasks:
    - name: Create a K8s namespace
      kubernetes.core.k8s:
        name: my-app
        api_version: v1
        kind: Namespace
        state: present
#        kubeconfig: /path/to/kubeconfigfile
- Requirements for module
- Python >= 2.7
- openshift
- PyYAML
Check if module exists
python3 -c "import openshift"
pip3 install PyYAML --user
pip3 install openshift --user
pip install- pip defaults to installing Python packages to a system directory. This requires root access
--usermakes pip install packages in your home directory instead. Requires no special privileges
Deploy App In New Namespace
deploy-to-k8s.yaml
---
- name: Deploy app in new namespace
  hosts: localhost
  tasks:
    - name: Create a K8s namespace
      kubernetes.core.k8s:
        name: my-app
        api_version: v1
        kind: Namespace
        state: present
#        kubeconfig: /path/to/kubeconfigfile
    - name: Deploy nginx app
      kubernetes.core.k8s:
        src: /Users/alfredamoah/GolandProjects/ansible-learn/k8s/nginx-config.yaml
        state: present
        namespace: my-app
- Can also write K8s YAML configs in Plays
Set environmental variable for Kubeconfig
- Define
kubeconfigonce - Can set an env
K8S_AUTH_KUBECONFIGbefore executing Ansible. It will point to thekubeconfig
Project: Ansible integration In Jenkins - Part 1
- Steps
- Create a DO server for Jenkins
- Formerly, we installed the tools inside the Jenkins server/container
- So, the commands were available for Jenkins jobs
- We'll do things differently with Ansible
- Create a DO server for Jenkins
- Create dedicated server for Ansible (Control Node)
- Install Ansible on that server
- Execute Ansible Playbook from Jenkins Pipeline to configure 2 EC2 Instances
- Create 2 EC2 instances
- Configure everything from scratch with Ansible
- Create a Pipeline in Jenkins
- Connect Pipeline to Java Maven Project
- Create Jenkinsfile that executes Ansible Playbook on the remote Ansible server
Prepare Ansible Control Node
- Create server
- SSH into server and install ansible
apt update
apt install ansible
- Need to install a Python module for AWS
apt install python3-pip
pip3 install boto3 botocore
- Configure aws credentials
- We'll use a dynamic inventory for this play
- We'll need credentials to make it work
mkdir .aws
vim credentials
- Copy local credentials to server
Create 2 EC2 Instances to be managed by Ansible
- Create new key-pair as well
Project: Ansible integration In Jenkins - Part 2
Jenkinsfile: Copy Files From Jenkins to Ansible Server
- We'll copy the inventory/host file, the playbook and the ansible config
- We'll copy the
pemfile from EC2 to ansible server from Jenkins- So key file should first be available on Jenkins
ansible.cfg
[defaults]
host_key_checking = False
inventory = inventory_aws_ec2.yaml
enable_plugins = amazon.aws.aws_ec2

interpreter_python = /usr/bin/python3

remote_user = ec2-user
private_key_file = ~/ssh-key.pem
inventory_aws_ec2.yaml
---
plugin: aws_ec2
regions:
  - us-east-1
#filters:
#  tag:Name: dev*
#  instance-state-name: running
keyed_groups:
  - key: tags
    prefix: tag
  - key: instance_type
    prefix: instance_type
my-playbook.yaml
---
- name: Install python3, docker, docker-compose
  hosts: aws_ec2
  become: yes
  gather_facts: False
  tasks:
    - name: Install python3 and docker
      vars:
        ansible_python_interpreter: /usr/bin/python
      ansible.builtin.yum:
        name:
          - python3
          - docker
        update_cache: yes
        state: present
    - name: Install Docker-compose
      ansible.builtin.get_url:
        # If the url isn't found, use 'url: https://github.com/docker/compose/releases/download/1.27.4/docker-compose-Linux-x86_64'
        # See available release tags per version here: https://github.com/docker/compose/releases
        url: https://github.com/docker/compose/releases/download/1.29.2/docker-compose-Linux-x86_64
        dest: /usr/local/bin/docker-compose
        mode: +x
    - name: Start docker daemon
      ansible.builtin.systemd:
        name: docker
        state: started
    - name: Install docker python module
      ansible.builtin.pip:
        name:
          - docker
          - docker-compose
- Create ansible-server-key on Jenkins
- SSH Username with private key
- Copy private key and paste
- Need to convert private keys with new OPENSSH format into old format to make it compatible for jenkins
- Create new credential for EC2 server
- Type: SSH Username with private key
Run
ssh-keygen -p -f .ssh/devops-droplet -m pem -P "" -N ""
Jenkinsfile
pipeline {
    agent any
    environment {
        ANSIBLE_SERVER = "64.226.121.168"
    }
    stages {
        stage("copy files to ansible server") {
            steps {
                script {
                    echo "copying all necessary files to ansible control node"
                    sshagent(['ansible-server-key']) {
                        sh "scp -o StrictHostKeyChecking=no ansible/* root@${ANSIBLE_SERVER}:/root"

                        withCredentials([sshUserPrivateKey(credentialsId: 'ec2-server-key', keyFileVariable: 'keyfile', usernameVariable: 'user')]) {
                            sh 'scp $keyfile root@$ANSIBLE_SERVER:/root/ssh-key.pem'
                        }
                    }
                }
            }
        }
    }
}
Jenkinsfile: Execute Ansible Playbook From Jenkins
- We'll need a plugin that enables us to execute command line commands on a remote server
- Plugin: SSH Pipeline Steps
Jenkinsfile: With Plugin
pipeline {
    agent any
    environment {
        ANSIBLE_SERVER = "64.226.121.168"
    }
    stages {
        stage("copy files to ansible server") {
            steps {
                script {
                    echo "copying all necessary files to ansible control node"
                    sshagent(['ansible-server-key']) {
                        sh "scp -o StrictHostKeyChecking=no ansible/* root@${ANSIBLE_SERVER}:/root"

                        withCredentials([sshUserPrivateKey(credentialsId: 'ec2-server-key', keyFileVariable: 'keyfile', usernameVariable: 'user')]) {
                            sh 'scp $keyfile root@$ANSIBLE_SERVER:/root/ssh-key.pem'
                        }
                    }
                }
            }
        }
        stage("execute ansible playbook") {
            steps {
                script {
                    echo "calling ansible playbook to configure ec2 instances"
                    def remote = [:]
                    remote.name = "ansible-server"
                    remote.host = ANSIBLE_SERVER
                    remote.allowAnyHosts = true

                    withCredentials([sshUserPrivateKey(credentialsId: 'ansible-server-key', keyFileVariable: 'keyfile', usernameVariable: 'user')]){
                        remote.user = user
                        remote.identityFile = keyfile
//                         sshScript remote: remote, script: "prepare-ansible-server.sh"
                        sshCommand remote: remote, command: "ansible-playbook my-playbook.yaml"
                    }
                }
            }
        }
    }
}
Jenkinsfile: Manual
pipeline {
    agent any
    environment {
        ANSIBLE_SERVER = "64.226.104.109"
    }
    stages {
        stage("copy files to ansible server") {
            steps {
                script {
                    echo "copying all necessary files to ansible control node"
                    sshagent(['ansible-server-key']) {
                        sh "scp -o StrictHostKeyChecking=no ansible/* root@${ANSIBLE_SERVER}:/root"

                        withCredentials([sshUserPrivateKey(credentialsId: 'ec2-server-key', keyFileVariable: 'keyfile', usernameVariable: 'user')]) {
                            sh 'scp $keyfile root@$ANSIBLE_SERVER:/root/ssh-key.pem'
                        }
                    }
                }
            }
        }
        stage("execute ansible playbook") {
            steps {
                script {
                    echo "calling ansible playbook to configure ec2 instances"
                    def remoteCommands = '''
                        echo ${ANSIBLE_SERVER}
                        ls
                        echo ${HOME}
                        ansible-playbook my-playbook.yaml
                    '''
                    sshagent(['ansible-server-key']) {
                        sh "ssh root@${ANSIBLE_SERVER} '${remoteCommands}'"
                    }
                }
            }
        }
    }
}
Project: Ansible integration in Jenkins - Part 3
- Automating server preparation
#!/usr/bin/env bash

apt update
apt install ansible -y
apt install python3-pip -y
pip3 install boto3 botocore
Ansible roles make your ansible content more reusable and modular
- Ansible Roles
- Group your content in roles
- Break up large playbooks into smaller manageable files to easily reuse and share them with others
- Role
- Package for your tasks in a play
- Can extract tasks and package them in smaller bundles
- Can be reused in multiple playbooks
- Roles contain
- Tasks that the role executes
- Static Files that the role deploys
- (Default) Variables for the tasks
- Parameterize role but execute without having to define variables
- Possibility to overwrite default values
- Custom modules, which are used within this role
- Roles have a standard file structure
- Can develop and test roles separately
- You can also use existing roles from the community
- Where to find roles
- Ansible Galaxy
- Git repos or other VCS
Create Ansible Roles
- Variables have precedence
- CLI
- Role vars
- Project vars
- Default variables have low precedence